Author: Vineet Tiwari

  • Best Free, open-source, and self-hosted CI/CD Tool to build and deploy

    Unlock Seamless Deployment with an Open Source CI/CD Self-Hosted Tool

    In today’s fast-paced development environment, having a reliable free CI/CD tool is essential for streamlining the deployment process. If you’re seeking an open source CI/CD self-hosted solution that gives you full control over your infrastructure, QuickStack is the answer. This innovative platform simplifies the management of your Linux servers and makes deploying containerized applications a breeze.

    What is QuickStack?

    QuickStack is a powerful, user-friendly web interface designed to automate the critical aspects of application deployment and management. Think of it as your very own personal cloud platform, built to run directly on your servers. It takes away the complexity of server management, allowing you to focus solely on your applications. With QuickStack, you can efficiently:

    • Build & Deploy Applications: Easily build and deploy applications to single or multiple server clusters.
    • Manage Applications: Monitor, back up, and manage your applications through a centralized web interface.

    QuickStack was developed by students at the Eastern Switzerland University of Applied Sciences, demonstrating its innovative approach to simplifying server management.

    Why Choose QuickStack as Your Free CI/CD Tool?

    QuickStack stands out as an exceptional open source CI/CD self-hosted option for several reasons:

    • Open Source and Free: QuickStack is completely open source and free to use, eliminating the costs associated with proprietary solutions.
    • Ease of Use: Its intuitive web interface lets you deploy and manage your applications effortlessly. You don’t need any command-line expertise; QuickStack handles everything for you.
    • Scalability: Easily manage multiple servers and applications from a single web UI, scaling your infrastructure as your needs grow.
    • Flexibility: Supports deployments from Docker images and Git repositories, offering a flexible solution for containerized applications.
    • Full Control: You maintain full control over your data and infrastructure, providing essential security and peace of mind.

    Who Can Benefit from QuickStack?

    QuickStack is the ideal free CI/CD tool for:

    • Developers: Who want to quickly deploy and manage applications without server administration hassles.
    • Small Teams and Startups: Seeking a cost-effective and easy-to-use deployment solution.
    • System Administrators: Who want to manage their infrastructure through a user-friendly interface.
    • Anyone: Looking for an easy way to deploy applications on their own servers, QuickStack makes the deployment process straightforward and efficient.

    How QuickStack Works Under the Hood

    QuickStack harnesses several powerful technologies to provide a robust platform:

    • k3s: A lightweight Kubernetes distribution.
    • Traefik: A reverse proxy and load balancer.
    • Longhorn: A distributed block storage solution.
    • Registry: A Docker registry for container images.
    • Kaniko: A tool for building container images within Kubernetes.

    Getting Started with QuickStack: Open Source CI/CD Self-Hosted

    Ready to start simplifying your deployment process? Here’s how to get started:

    1. Installation: Install QuickStack on your Linux server by following the installation guide available here
    2. Cluster Setup: Set up a cluster if you want to deploy applications across multiple servers.

    Step-by-Step Installation Guide

    Before you begin, ensure you have the following:

    • Linux Server: You’ll need a server with a fresh installation of Ubuntu and ssh access with sudo privileges.
      • Your server needs at least 2 CPU cores and 4 GB of RAM.
      • You can use any Server. If you wish to use a cloud provider, we recommend one of the following

    NOTE: QuickStack was tested on Hetzner and Azure. If you have any issues with other providers, please create an issue on our GitHub repository.

    Step-by-Step Guide

    Follow these steps to install QuickStack:

    1. Connect to your Server: Connect to the terminal of your server.
    2. Run the Installation Script: Copy and paste the following command into your terminal and press Enter. This command downloads and executes the QuickStack installation script:

     curl -sfL https://get.quickstack.dev/setup.sh | sh -

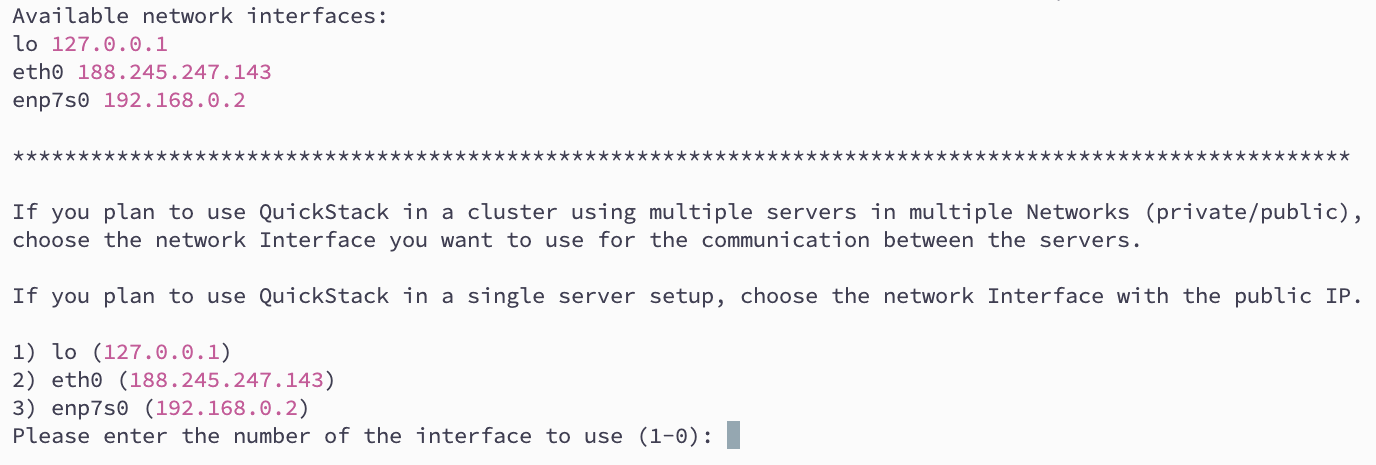
    3. Choose a Network Interface Depending on your setup you need to choose the correct network interface for cluster internal traffic. If you plan to create a cluster with multiple nodes and want to use the internal network for communication, you need to select the correct network interface. If you are unsure, choose the entry with the public IP address. Visit Cluster Setup: for further information on how to setup a cluster.
    open source ci/cd self-hosted
    1. Wait for the Installation: The installation script will now automatically install QuickStack and all necessary components on your Server. Please be patient as this process may take a few minutes. You’ll see text scrolling in your terminal – this is normal.
    2. Access the QuickStack Web UI: After the installation completes, open your web browser and navigate to the following URL. You must replace your_server_ip with the actual IP address of your Server. http://your_server_ip:30000
    Warning
    Make sure your firewall settings allow inbound traffic on port 30000, 80 and 443.
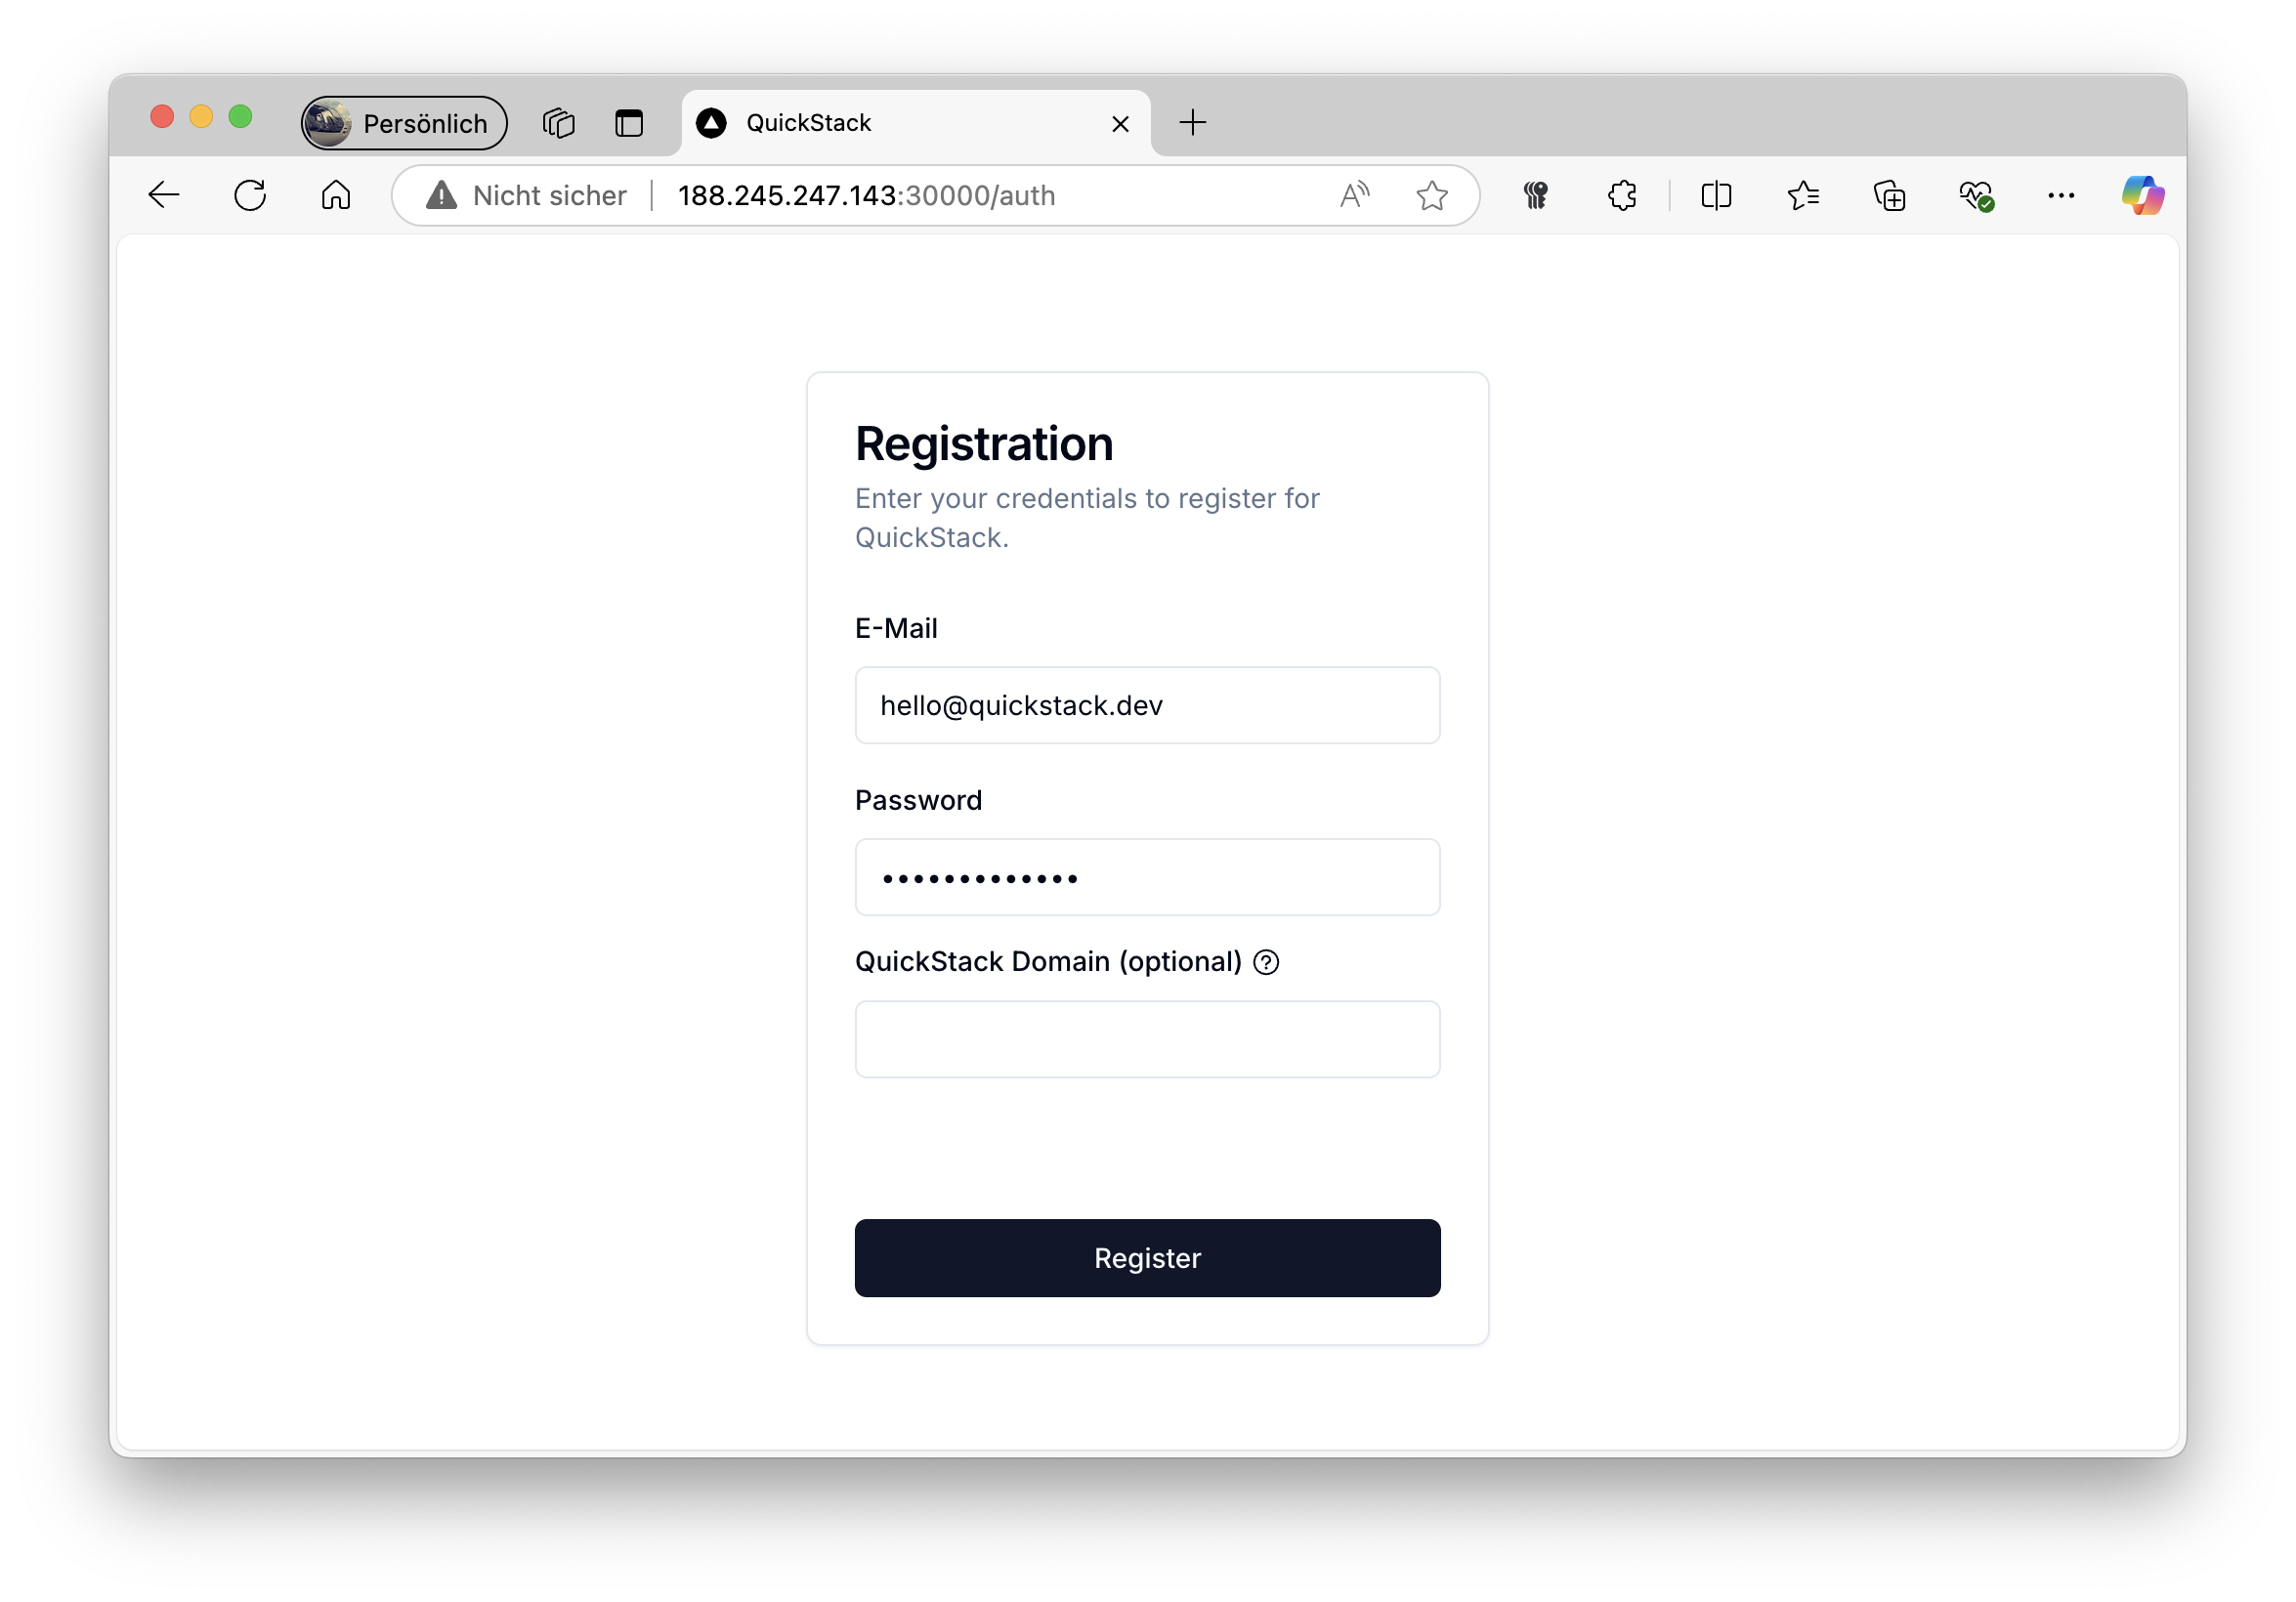
    1. Create a User Account You will be prompted to create a new user account when accessing the web UI for the first time. Complete the registration form by providing an email, a password and an optional quickstack domain.

    Hint

    If you already have a domain assigned to your QuickStacks Server IP, you can enter it in this field. This allows you to access the QuickStack UI through your domain. Leave it blank if you just want to use your IP address or want to configure it later.
    open source ci/cd self-hosted
    1. Start using QuickStack Log in with your newly created credentials and start using QuickStack!

    Create your first App

    Now that you have QuickStack installed, you can start deploying your first application. You can deploy applications from a Docker image or a Git repository. Visit the Managing Apps guide to learn more.

  • Free real-time Audio AI Model, Install multimodal LLM for real-time voice locally

    Free real-time Audio AI Model, Install multimodal LLM for real-time voice locally

    Free Real-Time Audio AI Model: Introducing Ultravox

    In the world of Artificial Intelligence, the ability to process and understand audio in real-time has opened up incredible possibilities. Imagine having an AI that can not only listen but also comprehend and respond to spoken words instantaneously. Today, we’re diving deep into Ultravox, a cutting-edge free real-time Audio AI Model that brings this vision to life. Built upon the robust Llama3.1-8B-Instruct and whisper-large-v3-turbo backbones, Ultravox stands as a powerful tool for real-time audio analysis and interaction.

    What Makes Ultravox a Game Changer, for free real-time Audio AI Model?

    Ultravox isn’t just another audio processing tool; it’s a multimodal speech Large Language Model (LLM) that can interpret both text and speech inputs. This means you can give it a text prompt and then follow up with a spoken message. The model processes this input in real-time, replacing a special <|audio|> token with embeddings derived from your audio input. The beauty of this approach is that it allows the model to act as a dynamic voice agent, capable of handling speech-to-speech translation, analyzing spoken content, and much more.

    How Does Ultravox Work?

    The magic behind Ultravox is its ingenious combination of pre-trained models. It utilizes Llama3.1-8B-Instruct for the language processing backbone and whisper-large-v3-turbo for the audio encoder. The system is designed so that only the multimodal adapter is trained, while the Whisper encoder and Llama remain frozen. This approach makes it efficient and effective. The model undergoes a knowledge-distillation process, aligning its outputs with those of the text-based Llama backbone. It is trained on a diverse mix of datasets, including ASR and speech translation data, enhanced by generated continuations from Llama 3.1 8B.

    Ultravox Tutorial: Setup and Install Ultravox Locally

    To get your hands on this free real-time Audio AI Model, you need to follow these simple steps:

    1. Installation: Start by installing the necessary libraries using pip:

    pip install transformers peft librosa

    2. Import Libraries: Import the libraries and load the model pipeline:

    import transformers
    import numpy as np
    import librosa
    
    pipe = transformers.pipeline(model='fixie-ai/ultravox-v0_4_1-llama-3_1-8b', trust_remote_code=True)

    3. Load Audio: Load your audio file, ensuring a 16000 sample rate:

    path = "<path-to-input-audio>"  # Replace with your audio file path
    audio, sr = librosa.load(path, sr=16000)

    4. Prepare the turns:

      turns = [
       {
         "role": "system",
         "content": "You are a friendly and helpful character. You love to answer questions for people."
       },
     ]

    5. Run the Model: Run the model by providing the audio, the turns and sampling rate:

    pipe({'audio': audio, 'turns': turns, 'sampling_rate': sr}, max_new_tokens=30)

    The Complete code to run the Ultravox is:

    # pip install transformers peft librosa
    
    import transformers
    import numpy as np
    import librosa
    
    pipe = transformers.pipeline(model='fixie-ai/ultravox-v0_4_1-llama-3_1-8b', trust_remote_code=True)
    
    path = "<path-to-input-audio>"  # TODO: pass the audio here
    audio, sr = librosa.load(path, sr=16000)
    
    
    turns = [
      {
        "role": "system",
        "content": "You are a friendly and helpful character. You love to answer questions for people."
      },
    ]
    pipe({'audio': audio, 'turns': turns, 'sampling_rate': sr}, max_new_tokens=30)
    

    Ultravox is a significant leap forward in the field of real-time audio AI. As a free real-time Audio AI Model, it empowers developers and researchers to create innovative solutions for various challenges. Whether you’re developing a sophisticated voice assistant or a real-time translation tool, Ultravox provides the necessary foundation. It showcases how open-source efforts can democratize access to cutting-edge technologies and is a great option for anyone exploring real-time audio processing with AI.
    With its robust functionality, real-time processing capabilities, and free access, Ultravox is definitely one of the leading models in the area of real-time audio AI.

    Visit HuggingFace, For Model Card. Also Visit the Free AI Avatar creation Platform like d-id, heygen, akool.

  • Free AI Avatar creation Platform like d-id, heygen, akool

    Free AI Avatar creation Platform like d-id, heygen, akool

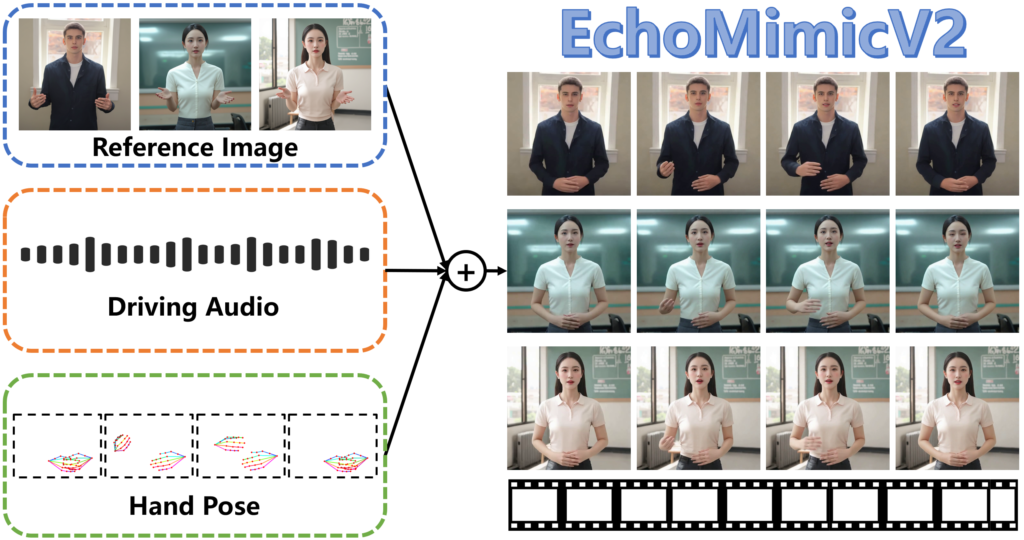
    Free AI Avatar Creation Platform, Are you fascinated by the capabilities of AI avatar platforms like D-ID, HeyGen, or Akool and want to build your own for free? This post dives into the technical details of creating a free, cutting-edge AI avatar creation platform by leveraging the power of EchoMimicV2. This technology allows you to create lifelike, animated avatars using just a reference image, audio, and hand poses. Here’s your guide to building this from scratch.

    EchoMimicV2: Your Free AI Avatar Creation Platform

    Free AI Avatar Creation

    EchoMimicV2, detailed in the research paper you provided, is a revolutionary approach to half-body human animation. It achieves impressive results with a simplified condition setup, using a novel Audio-Pose Dynamic Harmonization strategy. It smartly combines audio and pose conditions to generate expressive facial and gestural animations. This makes it an ideal foundation for building your free AI avatar creation platform. Key advantages include:

    • Simplified Conditions: Unlike other methods that use cumbersome control conditions, EchoMimicV2 is designed to be efficient, making it easier to implement and customize.
    • Audio-Pose Dynamic Harmonization (APDH): This strategy smartly synchronizes audio and pose, enabling lifelike animations.
    • Head Partial Attention (HPA): EchoMimicV2 can seamlessly integrate headshot data to enhance facial expressions, even when full-body data is scarce.
    • Phase-Specific Denoising Loss (PhD Loss): Optimizes animation quality by focusing on motion, detail, and low-level visual fidelity during specific phases of the denoising process.

    Technical Setup: Getting Started with EchoMimicV2

    To create your own free platform, you will need a development environment. Here’s how to set it up, covering both automated and manual options.

    1. Cloning the Repository

    First, clone the EchoMimicV2 repository from GitHub:

    git clone https://github.com/antgroup/echomimic_v2
    cd echomimic_v2

    2. Automated Installation (Linux)

    For a quick setup, especially on Linux systems, use the provided script:

    sh linux_setup.sh

    This will handle most of the environment setup, given you have CUDA >= 11.7 and Python 3.10 pre-installed.

    3. Manual Installation (Detailed)

    If the automated installation doesn’t work for you, here’s how to set things up manually:

    3.1. Python Environment:

    • System: The system has been tested on CentOS 7.2/Ubuntu 22.04 with CUDA >= 11.7
    • GPUs: Recommended GPUs are A100(80G) / RTX4090D (24G) / V100(16G)
    • Python: Tested with Python versions 3.8 / 3.10 / 3.11. Python 3.10 is strongly recommended.

    Create and activate a new conda environment:

    conda create -n echomimic python=3.10
    conda activate echomimic

    3.2. Install Required Packages

    pip install pip -U
    pip install torch==2.5.1 torchvision==0.20.1 torchaudio==2.5.1 xformers==0.0.28.post3 --index-url https://download.pytorch.org/whl/cu124
    pip install torchao --index-url https://download.pytorch.org/whl/nightly/cu124
    pip install -r requirements.txt
    pip install --no-deps facenet_pytorch==2.6.0

    3.3. Download FFmpeg:

    Download and extract ffmpeg-static, and set the FFMPEG_PATH variable:

    export FFMPEG_PATH=/path/to/ffmpeg-4.4-amd64-static

    3.4. Download Pretrained Weights:

    Use Git LFS to manage large files:

    git lfs install
    git clone https://huggingface.co/BadToBest/EchoMimicV2 pretrained_weights

    The pretrained_weights directory will have the following structure:

    ./pretrained_weights/
    ├── denoising_unet.pth
    ├── reference_unet.pth
    ├── motion_module.pth
    ├── pose_encoder.pth
    ├── sd-vae-ft-mse
    │   └── ...
    └── audio_processor
        └── tiny.pt

    These are the core components for your AI avatar creation platform.

    4. Running the Platform

    Now that everything is set up, let’s look at running the code.

    4.1. Gradio Demo

    To launch the Gradio demo, run:

    python app.py

    4.2. Python Inference Script

    To run a python inference, run this command:

    python infer.py --config='./configs/prompts/infer.yaml'

    4.3. Accelerated Inference

    For faster results, use the accelerated version by adjusting the configuration:

    python infer_acc.py --config='./configs/prompts/infer_acc.yaml'

    5. Preparing and Processing the EMTD Dataset

    EchoMimicV2 offers a dataset for testing half-body animation. Here is how to download, slice, and preprocess it:

    python ./EMTD_dataset/download.py
    bash ./EMTD_dataset/slice.sh
    python ./EMTD_dataset/preprocess.py

    Diving Deeper: Customization & Advanced Features

    With the base system set up, explore the customization opportunities that will make your Free AI Avatar Creation Platform stand out:

    • Adjusting Training Parameters: Experiment with parameters like learning rates, batch sizes, and the duration of various training phases to optimize performance and tailor your platform to specific needs.
    • Integrating Custom Datasets: Train the model with your own datasets of reference images, audios, and poses to create avatars with your specific look, voice, and behavior.
    • Refining Animation Quality: Use different phases of PhD Loss for the quality of motion, detail and low visual level.

    Building a Free AI Avatar Creation Platform is a challenging yet achievable task. This post provided the first step in achieving this goal by focusing on the EchoMimicV2 framework. Its innovative approach simplifies the control of animated avatars and offers a solid foundation for further improvements and customization. By leveraging its Audio-Pose Dynamic Harmonization, Head Partial Attention and the Phase-Specific Denoising Loss you can create a truly captivating and free avatar creation experience for your audience.

  • AI Agents by Google: Revolutionizing AI with Reasoning and Tools

    AI Agents by Google: Revolutionizing AI with Reasoning and Tools

    Artificial Intelligence is rapidly changing, and AI Agents by Google are at the forefront. These aren’t typical AI models. Instead, they are complex systems. They can reason, make logical decisions, and interact with the world using tools. This article explores what makes them special. Furthermore, it will examine how they are changing AI applications.

    Understanding AI Agents

    AI Agents by Google

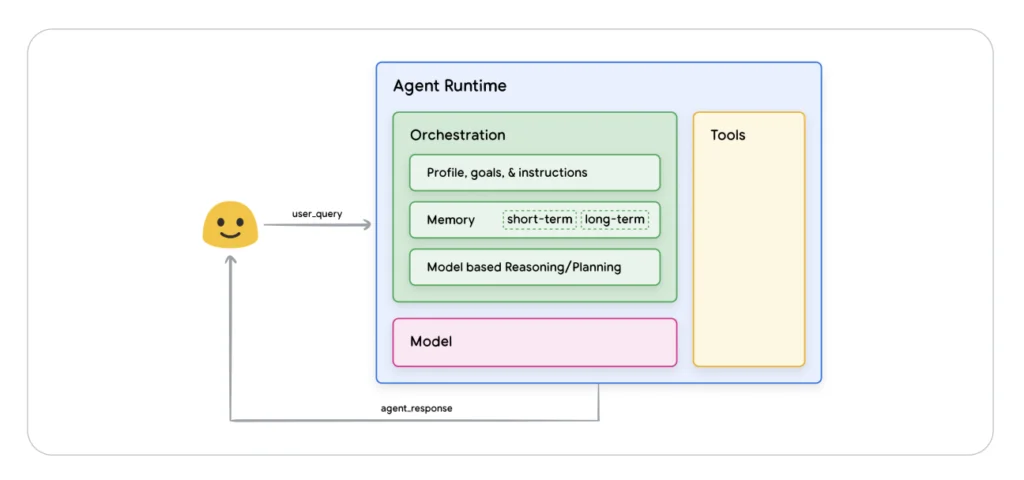
    Essentially, AI Agents by Google are applications. The aim of AI Agents to achieve goals. They do this by observing their environment. They also use available tools. Unlike basic AI, agents are autonomous. They act independently. Moreover, they proactively make decisions. This helps them meet objectives, even without direct instructions. This is possible through their cognitive architecture, which includes three key parts:

    • The Model: This is the core language model. It is the central decision-maker. It uses reasoning frameworks like ReAct. Also, it uses Chain-of-Thought and Tree-of-Thoughts.
    • The Tools: These are crucial for external interaction. They allow the agent to connect to real-time data and services. For example, APIs can be used. They bridge the gap between internal knowledge and outside resources.
    • The Orchestration Layer: This layer manages the agent’s process. It determines how it takes in data. Then, it reasons internally. Finally, it informs the next action or decision in a continuous cycle.

    AI Agents vs. Traditional AI Models

    Traditional AI models have limitations. They are restricted by training data. They perform single inferences. In contrast, AI Agents by Google overcome these limits. They do this through several capabilities:

    • External System Access: They connect to external systems via tools. Thus, they interact with real-time data.
    • Session History Management: Agents track and manage session history. This enables multi-turn interactions with context.
    • Native Tool Implementation: They include built-in tools. This allows seamless execution of external tasks.
    • Cognitive Architectures: They utilize advanced frameworks. For instance, they use CoT and ReAct for reasoning.

    The Role of Tools: Extensions, Functions, and Data Stores

    AI Agents by Google interact with the outside world through three key tools:

    Extensions

    These tools bridge agents and APIs. They allow agents to use APIs to carry out actions through examples. For instance, they can use the Google Flights API. Extensions run on the agent-side. They are designed to make integrations scalable and strong.

    Functions

    Functions are self-contained code modules. Models use them for specific tasks. Unlike Extensions, these run on the client side. They don’t directly interact with APIs. This gives developers greater control over data flow and system execution.

    Data Stores

    Data Stores enable agents to access diverse data. This includes structured and unstructured data from various sources. For instance, they can access websites, PDFs, and databases. This dynamic interaction with current data enhances the model’s knowledge. Furthermore, it aids applications using Retrieval Augmented Generation (RAG).

    Improving Agent Performance

    To get the best results, AI Agents need targeted learning. These methods include:

    • In-context learning: Examples provided during inference let the model learn “on-the-fly.”
    • Retrieval-based in-context learning: External memory enhances this process. It provides more relevant examples.
    • Fine-tuning based learning: Pre-training the model is key. This improves its understanding of tools. Moreover, it improves its ability to know when to use them.

    Getting Started with AI Agents

    If you’re interested in building with AI Agents, consider using libraries like LangChain. Also, you might use platforms such as Google’s Vertex AI. LangChain helps users ‘chain’ sequences of logic and tool calls. Meanwhile, Vertex AI offers a managed environment. It supports building and deploying production-ready agents.

    AI Agents by Google are transforming AI. They go beyond traditional limits. They can reason, use tools, and interact with the external world. Therefore, they are a major step forward. They create more flexible and capable AI systems. As these agents evolve, their ability to solve complex problems will also grow. In addition, their capacity to drive real-world value will expand.

    Read More on the AI Agents by Google Whitepaper by Google.

  • Enterprise Agentic RAG Template by Dell AI Factory with NVIDIA

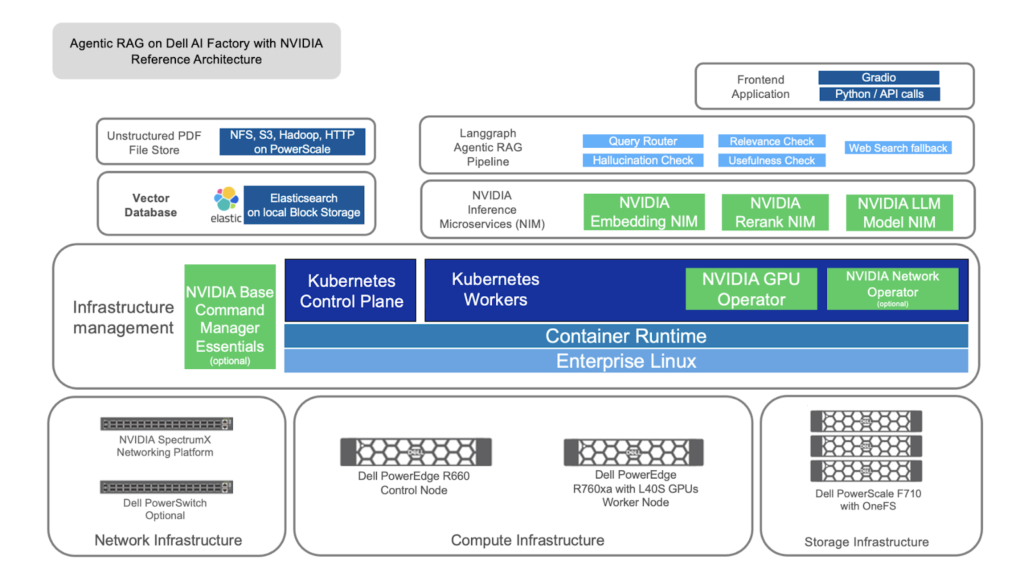
    In today’s data-driven world, organizations are constantly seeking innovative solutions to extract value from their vast troves of information. The convergence of powerful hardware, advanced AI frameworks, and efficient data management systems is critical for success. This post will delve into a cutting-edge solution: Enterprise Agentic RAG on Dell AI Factory with NVIDIA and Elasticsearch vector database. This architecture provides a scalable, compliant, and high-performance platform for complex data retrieval and decision-making, with particular relevance to healthcare and other data-intensive industries.

    Understanding the Core Components

    Before diving into the specifics, let’s define the key components of this powerful solution:

    • Agentic RAG: Agentic Retrieval-Augmented Generation (RAG) is an advanced AI framework that combines the power of Large Language Models (LLMs) with the precision of dynamic data retrieval. Unlike traditional LLMs that rely solely on pre-trained knowledge, Agentic RAG uses intelligent agents to connect with various data sources, ensuring contextually relevant, up-to-date, and accurate responses. It goes beyond simple retrieval to create a dynamic workflow for decision-making.
    • Dell AI Factory with NVIDIA: This refers to a robust hardware and software infrastructure provided by Dell Technologies in collaboration with NVIDIA. It leverages NVIDIA GPUs, Dell PowerEdge servers, and NVIDIA networking technologies to provide an efficient platform for AI training, inference, and deployment. This partnership brings together industry-leading hardware with AI microservices and libraries, ensuring optimal performance and reliability.
    • Elasticsearch Vector Database: Elasticsearch is a powerful, scalable search and analytics engine. When configured as a vector database, it stores vector embeddings of data (e.g., text, images) and enables efficient similarity searches. This is essential for the RAG process, where relevant information needs to be retrieved quickly from large datasets.

    The Synergy of Enterprise Agentic RAG, Dell AI Factory, and Elasticsearch

    The integration of Agentic RAG on Dell AI Factory with NVIDIA and Elasticsearch vector database creates a powerful ecosystem for handling complex data challenges. Here’s how these components work together:

    1. Data Ingestion: The process begins with the ingestion of structured and unstructured data from various sources. This includes documents, PDFs, text files, and structured databases. Dell AI Factory leverages specialized tools like the NVIDIA Multimodal PDF Extraction Tool to convert unstructured data (e.g., images and charts in PDFs) into searchable formats.
    2. Data Storage and Indexing: The extracted data is then transformed into vector embeddings using NVIDIA NeMo Embedding NIMs. These embeddings are stored in the Elasticsearch vector database, which allows for efficient semantic searches. Elasticsearch’s fast search capabilities ensure that relevant data can be accessed quickly.
    3. Data Retrieval: Upon receiving a query, the system utilizes the NeMo Retriever NIM to fetch the most pertinent information from the Elasticsearch vector database. The NVIDIA NeMo Reranking NIM refines these results to ensure that the highest quality, contextually relevant content is delivered.
    4. Response Generation: The LLM agent, powered by NVIDIA’s Llama-3.1-8B-instruct NIM or similar LLMs, analyzes the retrieved data to generate a contextually aware and accurate response. The entire process is orchestrated by LangGraph, which ensures smooth data flow through the system.
    5. Validation: Before providing the final answer, a hallucination check module ensures that the response is grounded in the retrieved data and avoids generating false or unsupported claims. This step is particularly crucial in sensitive fields like healthcare.

    Benefits of Agentic RAG on Dell AI Factory with NVIDIA and Elasticsearch

    This powerful combination offers numerous benefits across various industries:

    • Scalability: The Dell AI Factory’s robust infrastructure, coupled with the scalability of Elasticsearch, ensures that the solution can handle massive amounts of data and user requests without performance bottlenecks.
    • Compliance: The solution is designed to adhere to stringent security and compliance requirements, particularly relevant in healthcare where HIPAA compliance is essential.
    • Real-Time Decision-Making: Through efficient data retrieval and analysis, professionals can access timely, accurate, and context-aware information.
    • Enhanced Accuracy: The combination of a strong retrieval system and a powerful LLM ensures that the responses are not only contextually relevant but also highly accurate and reliable.
    • Flexibility: The modular design of the Agentic RAG framework, with its use of LangGraph, makes it adaptable to diverse use cases, whether for chatbots, data analysis, or other AI-powered applications.
    • Comprehensive Data Support: This solution effectively manages a wide range of data, including both structured and unstructured formats.
    • Improved Efficiency: By automating the data retrieval and analysis process, the framework reduces the need for manual data sifting and improves overall productivity.

    Real-World Use Cases for Enterprise Agentic RAG

    This solution can transform workflows in many different industries and has particular relevance for use cases in healthcare settings:

    • Healthcare:
      • Providing clinicians with fast access to patient data, medical protocols, and research findings to support better decision-making.
      • Enhancing patient interactions through AI-driven chatbots that provide accurate, secure information.
      • Streamlining processes related to diagnosis, treatment planning, and drug discovery.
    • Finance:
      • Enabling rapid access to financial data, market analysis, and regulations for better investment decisions.
      • Automating processes related to fraud detection, risk analysis, and regulatory compliance.
    • Legal:
      • Providing legal professionals with quick access to case laws, contracts, and legal documents.
      • Supporting faster research and improved decision-making in legal proceedings.
    • Manufacturing:
      • Providing access to operational data, maintenance logs, and training manuals to improve efficiency.
      • Improving workflows related to predictive maintenance, quality control, and production management.

    Getting Started with Enterprise Agentic RAG

    The Dell AI Factory with NVIDIA, when combined with Elasticsearch, is designed for enterprises that require scalability and reliability. To implement this solution:

    1. Leverage Dell PowerEdge servers with NVIDIA GPUs: These powerful hardware components provide the computational resources needed for real-time processing.
    2. Set up Elasticsearch Vector Database: This stores and indexes your data for efficient retrieval.
    3. Install NVIDIA NeMo NIMs: Integrate NVIDIA’s NeMo Retriever, Embedding, and Reranking NIMs for optimal data retrieval and processing.
    4. Utilize the Llama-3.1-8B-instruct LLM: Utilize NVIDIA’s optimized LLM for high-performance response generation.
    5. Orchestrate workflows with LangGraph: Connect all components with LangGraph to manage the end-to-end process.

    Enterprise Agentic RAG on Dell AI Factory with NVIDIA and Elasticsearch vector database is not just an integration; it’s a paradigm shift in how we approach complex data challenges. By combining the precision of enterprise-grade hardware, the power of NVIDIA AI libraries, and the efficiency of Elasticsearch, this framework offers a robust and scalable solution for various industries. This is especially true in fields such as healthcare where reliable data access can significantly impact outcomes. This solution empowers organizations to make informed decisions, optimize workflows, and improve efficiency, setting a new standard for AI-driven data management and decision-making.

    Read More by Dell: https://infohub.delltechnologies.com/en-us/t/agentic-rag-on-dell-ai-factory-with-nvidia/

    Start Learning Enterprise Agentic RAG Template by Dell

  • Free, Open Source Realtime 3D Model: SPAR3D by Stability AI

    Realtime 3D model, Stability AI is revolutionizing the world of 3D content creation with its latest offering: SPAR3D, a groundbreaking free and open-source realtime 3D model. This model enables users to generate, edit, and interact with 3D objects from single images in real-time, combining impressive speed with unparalleled control. SPAR3D is not just a 3D model; it’s a comprehensive tool designed to transform 3D prototyping for game developers, product designers, environment builders, and anyone needing high-quality 3D assets.

    What is SPAR3D?

    SPAR3D (Stable Point Aware 3D) is a state-of-the-art 3D reconstruction model that achieves high-quality 3D mesh generation from single-view images, in near real-time. Unlike traditional 3D modeling methods, SPAR3D uniquely combines precise point cloud sampling with advanced mesh generation. What sets SPAR3D apart is its support for real-time editing, allowing users to make on-the-fly adjustments and modifications to 3D objects. Furthermore, this is available as free and open source under the Stability AI Community License.

    Key Features and Benefits of SPAR3D

    SPAR3D provides several significant advantages over other 3D modeling techniques:

    • Real-Time Editing: Allows users to directly manipulate the 3D model by editing the point cloud, deleting, duplicating, stretching, and even recoloring points. This level of control is unmatched by other methods.
    • Complete Structure Prediction: Generates not only the visible surfaces from an input image, but also accurately predicts the full 360-degree view, including traditionally hidden surfaces on the back of the object. This gives a complete picture of the 3D object.
    • Lightning-Fast Generation: Converts edited point clouds into final 3D meshes in just 0.3 seconds, enabling seamless real-time editing, and generates the complete 3D mesh from a single input image in only 0.7 seconds per object.
    • High-Quality Meshes: Achieves precise geometry and detailed textures, producing visually accurate and high-fidelity 3D assets.
    • Open Source and Free: Licensed under the Stability AI Community License, SPAR3D is free for both commercial and non-commercial use, making it accessible to a wide range of users.
    • Accessibility: The weights of SPAR3D are available on Hugging Face, and the code is available on GitHub, with access through the Stability AI Developer Platform API.
    • Compatibility: Ideal for running on NVIDIA RTX AI PCs

    How SPAR3D Works: A Two-Stage Architecture

    SPAR3D’s a Realtime 3D models, innovative approach involves a first-of-its-kind, two-stage architecture:

    1. Point Sampling Stage: A specialized point diffusion model generates a detailed point cloud, capturing the object’s fundamental structure. This point cloud represents the underlying structure of the object.
    2. Meshing Stage: The triplane transformer processes this point cloud alongside the original image features, producing high-resolution triplane data. This data is then used to generate the final 3D mesh, with precise geometry, texture, and illumination information.

    By combining precise point cloud sampling and advanced mesh generation, SPAR3D takes the best of both regression-based modeling’s precision and generative techniques’ flexibility. This results in accurate 360-degree predictions and highly controllable 3D object generation.

    Real-World Applications of SPAR3D a Realtime 3D model

    SPAR3D’s capabilities make it suitable for a wide variety of applications, including:

    • Game Development: Rapidly create and modify 3D game assets, from characters to environments.
    • Product Design: Quickly prototype and refine product designs, enabling faster iteration and improved design processes.
    • Architecture and Interior Design: Design and visualize 3D spaces and objects, creating immersive experiences for clients.
    • Filmmaking: Create realistic 3D props and environments for film and animation projects.
    • Augmented Reality (AR): Develop interactive 3D objects for AR applications with real-time manipulation.
    • Virtual Reality (VR): Generate high-quality 3D assets for VR environments.
    • Education: Provide interactive 3D models for education and training purposes.
    • Research: Enable faster iteration for generating high quality 3D assets in AI/ML research.

    Getting Started with SPAR3D, Realtime 3D model

    SPAR3D is designed for ease of access and implementation. You can get started by:

    • Downloading weights from Hugging Face: Access the pre-trained model weights to quickly integrate SPAR3D into your projects.
    • Accessing code on GitHub: Explore the open-source codebase, enabling you to modify and extend the model to meet specific needs.
    • Using Stability AI Developer Platform API: Integrate SPAR3D into your applications and workflows through the Stability AI Developer Platform API.

    SPAR3D by Stability AI is setting a new benchmark for real-time 3D object generation and editing. As a free and open-source tool, it empowers creators across multiple industries, from game development and product design to filmmaking and augmented reality. Its innovative architecture, unprecedented control, and lightning-fast generation make it an essential asset for anyone working with 3D content. Embrace the future of 3D modeling with SPAR3D and unlock new possibilities for creativity and efficiency.

  • LLM for Vehicles: Small Language Models for Vehicles for In-Car

    LLMs for vehicles, The automotive industry is undergoing a significant transformation, with software playing an increasingly vital role. Large language models (LLMs), specifically optimized small language models (sLMS), are emerging as powerful tools to enhance in-vehicle experiences. This post will delve into the world of LLMs for vehicles, explaining what they are, how we can benefit from them, their real-world use cases, and how they are optimized for in-vehicle function-calling. We will also briefly touch upon specific efforts like the Mercedes Benz LLM model.

    What are LLMs and sLMS?

    LLMs (Large Language Models) are sophisticated AI models trained on vast amounts of text data. They excel at understanding and generating human-like text, enabling a wide range of applications such as natural language processing, text generation, and question answering. However, traditional LLMs are often too large to be deployed on resource-constrained devices such as those found in vehicles.

    This is where sLMS (Small Language Models) come into play. sLMS, or Small large language models, are smaller, more efficient versions of LLMs, specifically designed to run on edge devices with limited computational resources. They are optimized for size and speed while maintaining a high level of performance, making them ideal for in-vehicle applications.

    How Can We Benefit from LLMs and sLMS in Vehicles?

    The integration of LLMs for vehicles, particularly through sLMS, offers numerous benefits:

    • Enhanced User Experience: Natural, intuitive voice commands make interacting with vehicle systems easier and more user-friendly.
    • Personalization: sLMS can understand user preferences and adapt vehicle settings accordingly.
    • Seamless Integration: New features and updates can be integrated more quickly, reducing development time.
    • Dynamic Control: Vehicle settings, such as seat heating, lighting, and temperature, can be controlled dynamically based on driver conditions.
    • Reduced Distractions: Voice-activated controls minimize the need for manual adjustments, enhancing driving safety.
    • Improved Safety: By having natural language processing of the data and the environment, the vehicle can get more accurate information and control, which ultimately makes the drive safer.

    Real Use Cases of LLMs and sLMS in Vehicles

    The real-world applications of LLMs for vehicles and sLMS are rapidly expanding, transforming in-car experiences:

    • Voice Assistants: Responding to voice commands for setting navigation, making calls, or playing music.
    • Interior Control: Dynamically adjusting vehicle settings such as seat heating, ambient lighting, and temperature based on user preferences.
    • Real-Time Information: Providing real-time updates on traffic, weather, and nearby points of interest.
    • Personalized Recommendations: Suggesting music, points of interest, or routes based on past preferences and driving habits.
    • On-Demand Information Access: Answering user questions about vehicle functions or maintenance.
    • Integration with External Services: Connecting with external applications for seamless control of smart home devices or scheduling apps.
    • Adaptive Driver Assistance Systems: Enhancing driver assist systems with better awareness of the environment and the driver.

    Optimizing Small Language Models for In-Vehicle Function-Calling

    Deploying sLMS effectively in vehicles requires careful optimization. The provided PDF highlights several techniques used to optimize the performance of Small Language Models for In-Vehicle Function-Calling:

    • Model Pruning: Reduces model size by removing less important connections or layers. Depth-wise pruning and width-wise pruning are employed.
      • Depth-wise pruning focuses on removing entire layers based on similarity.
      • Width-wise pruning aims at reducing the dimensionality of the layer through techniques like Principal Component Analysis (PCA).
    • Healing: Fine-tuning the pruned model to recover its performance, using techniques like Low-Rank Adaptation (LoRA) and full fine-tuning.
    • Quantization: Reducing the numerical precision of model weights to further decrease the size and computational requirements.
    • Task-Specific Fine-Tuning: Training models on custom datasets for in-vehicle function-calling, incorporating specialized tokens that map language model outputs to gRPC-based vehicle functions.

    Specifically, the optimization involves:

    • Utilizing special MB tokens for vehicle functions to ensure that the language model can directly control the vehicles functions.
    • Employing a multi-step prompt design to generate high-quality training examples.
    • Leveraging lightweight runtimes like llama.cpp for on-device inference.

    This combination of techniques enables efficient LLM for vehicles deployment on resource-constrained automotive hardware.

    Mercedes-Benz LLM Model

    Mercedes-Benz, like many automotive manufacturers, is actively exploring the use of LLMs for vehicles to enhance their in-car experiences. While the specific details of their current model are not the focus of the provided PDF, the research presented is closely aligned with those goals. The use of optimized sLMS such as Phi-3 mini, along with specific in-vehicle function-calling dataset is designed to align with the automotive sector and shows an effort to improve the in-car LLM technology.

    The approach used demonstrates how real-time, on-device inference of LLM for functions like voice-command, ambient adjustments or maintenance requests, is made possible through advanced optimization techniques and will allow for more advanced in vehicle experience.

    Read More on this from the paper published by Mercedes-Benz Research & Development Team.

  • Sonus-1: FREE Reasoning Model beats OpenAI’s new O1 Pro

    Introducing Sonus-1: A High-Performing, FREE Reasoning Model, Rubik’s Sonus 1 model is a free new model that can do reasoning across multiple tasks and beats OpenAI’s new O1 Pro mode for free.

    The Sonus-1 family of Large Language Models (LLMs) is designed to be both powerful and versatile, excelling across a range of applications. Sonus-1 is offered to the community completely free, allowing users to leverage cutting-edge AI without cost or restrictions.

    The Sonus-1 Family: Pro, Air, and Mini

    The Sonus-1 series is designed to cater to a variety of needs:

    • Sonus-1 Mini: Prioritizes speed, offering cost-effective solutions with fast performance.
    • Sonus-1 Air: Provides a versatile balance between performance and resource usage.
    • Sonus-1 Pro: Is optimized for complex tasks that demand the highest performance levels.
    • Sonus-1 Pro (w/ Reasoning): Is the flagship model, enhanced with chain-of-thought reasoning to tackle intricate problems.

    Sonus-1 Pro (w/ Reasoning): A Focus on High-Performance Reasoning

    The Sonus-1 Pro (w/ Reasoning) model is engineered to excel in challenging tasks requiring sophisticated problem-solving, particularly in reasoning, mathematics, and code.

    Benchmark Performance: Sonus-1 Pro Outperforms The Competition

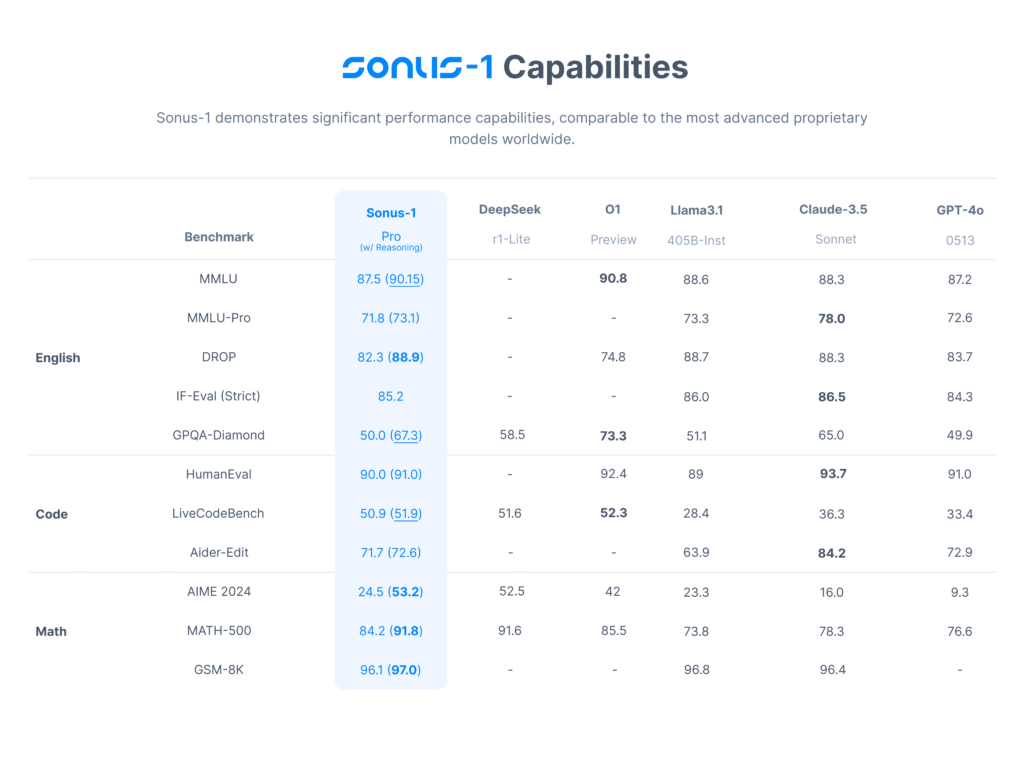
    The Sonus-1 family, particularly the Pro model, demonstrates impressive performance across diverse benchmarks. Here’s a detailed breakdown, emphasizing the capabilities of the Sonus-1 Pro (w/ Reasoning) model:

    Sonus-1 capabilities

    Key Highlights from the Benchmark Data:

    • MMLU: The Sonus-1 Pro (w/ Reasoning) model achieves 90.15% demonstrating its powerful general reasoning capabilities.
    • MMLU-Pro: Achieves 73.1%, highlighting its robust capabilities for more complex reasoning problems.
    • Math (MATH-500): With a score of 91.8%, Sonus-1 Pro (w/ Reasoning) proves its prowess in handling intricate mathematical problems.
    • Reasoning (DROP): Achieves 88.9%, demonstrating its strong capabilities in reasoning tasks.
    • Reasoning (GPQA-Diamond): Achieves 67.3% on the challenging GPQA-Diamond, highlighting its ability in scientific reasoning.
    • Code (HumanEval): Scores 91.0%, showcasing its strong coding abilities.
    • Code (LiveCodeBench): Achieves 51.9%, displaying impressive performance in real-world code environments.
    • Math (GSM-8k): Achieves an impressive 97% on the challenging GSM-8k math test.
    • Code (Aider-Edit): Demonstrates solid performance in code editing by achieving 72.6%.

    Sonus-1 Pro excels in various benchmarks, and stands out in reasoning and mathematical tasks, often surpassing the performance of other proprietary models.

    Where to Try Sonus-1?

    The Sonus-1 suite of models can be explored at chat.sonus.ai. Users are encouraged to test the models and experience their performance firsthand.

    What’s Next?

    The development of high-performance, reliable, and privacy-focused LLMs is ongoing, with future releases planned to tackle even more complex problems.

    Try Sonus-1 Demo Here: https://chat.sonus.ai/sonus

  • NVIDIA NV Ingest for Complex Unstructured PDFs, Enterprise Documents

    What is NVIDIA NV Ingest?

    NVIDIA NV Ingest is not a static pipeline; it’s a dynamic microservice designed for processing various document formats, including PDF, DOCX, and PPTX. It uses NVIDIA NIM microservices to identify, extract, and contextualize information, such as text, tables, charts, and images. The core aim is to transform unstructured data into structured metadata and text, facilitating its use in downstream applications

    At its core, NVIDIA NV Ingest is a performance-oriented, scalable microservice designed for document content and metadata extraction. Leveraging specialized NVIDIA NIM microservices, this tool goes beyond simple text extraction. It intelligently identifies, contextualizes, and extracts text, tables, charts, and images from a variety of document formats, including PDFs, Word, and PowerPoint files. This enables a streamlined workflow for feeding data into downstream generative AI applications, such as retrieval-augmented generation (RAG) systems.

    NVIDIA Ingest works by accepting a JSON job description, outlining the document payload and the desired ingestion tasks. The result is a JSON dictionary containing a wealth of metadata about the extracted objects and associated processing details. It’s crucial to note that NVIDIA Ingest doesn’t simply act as a wrapper around existing parsing libraries; rather, it’s a flexible and adaptable system that is designed to manage complex document processing workflows.

    Key Capabilities

    Here’s what NVIDIA NV Ingest is capable of:

    • Multi-Format Support: Handles a variety of documents, including PDF, DOCX, PPTX, and image formats.
    • Versatile Extraction Methods: Offers multiple extraction methods per document type, balancing throughput and accuracy. For PDFs, you can leverage options like pdfium, Unstructured.io, and Adobe Content Extraction Services.
    • Advanced Pre- and Post-Processing: Supports text splitting, chunking, filtering, embedding generation, and image offloading.
    • Parallel Processing: Enables parallel document splitting, content classification (tables, charts, images, text), extraction, and contextualization via Optical Character Recognition (OCR).
    • Vector Database Integration: NVIDIA Ingest also manages the computation of embeddings and can optionally store these into vector database like Milvus

    Why NVIDIA NV Ingest?

    Unlike static pipelines, NVIDIA Ingest provides a flexible framework. It is not a wrapper for any specific parsing library. Instead, it orchestrates the document processing workflow based on your job description.

    The need to parse hundreds of thousands of complex, messy unstructured PDFs is often a major hurdle. NVIDIA Ingest is designed for exactly this scenario, providing a robust and scalable system for large-scale data processing. It breaks down complex PDFs into discrete content, contextualizes it through OCR, and outputs a structured JSON schema which is very easy to use for AI applications.

    Getting Started with NVIDIA NV Ingest

    To get started, you’ll need:

    • Hardware: NVIDIA GPUs (H100 or A100 with at least 80GB of memory, with minimum of 2 GPUs)

    Software

    • Operating System: Linux (Ubuntu 22.04 or later is recommended)
    • Docker: For containerizing and managing microservices
    • Docker Compose: For multi-container application deployment
    • CUDA Toolkit: (NVIDIA Driver >= 535, CUDA >= 12.2)
    • NVIDIA Container Toolkit: For running NVIDIA GPU-accelerated containers
    • NVIDIA API Key: Required for accessing pre-built containers from NVIDIA NGC. To get early access for NVIDIA Ingest https://developer.nvidia.com/nemo-microservices-early-access/join

    Step-by-Step Setup and Usage

    1. Starting NVIDIA NIM Microservices Containers

    1. Clone the repository:
      git clone
      https://github.com/nvidia/nv-ingest
      cd nv-ingest
    2. Log in to NVIDIA GPU Cloud (NGC):
      docker login nvcr.io
      # Username: $oauthtoken
      # Password: <Your API Key>
    3. Create a .env file: 
      Add your NGC API key and any other required paths:
      NGC_API_KEY=your_api_key NVIDIA_BUILD_API_KEY=optional_build_api_key
    4. Start the containers:
      sudo nvidia-ctk runtime configure --runtime=docker --set-as-default
      docker compose up

    Note: NIM containers might take 10-15 minutes to fully load models on first startup.

    2. Installing Python Client Dependencies

    1. Create a Python environment (optional but recommended):
      conda create --name nv-ingest-dev --file ./conda/environments/nv_ingest_environment.yml
      conda activate nv-ingest-dev
    2. Install the client:
      cd client
      pip install .

    if you are not using conda you can install directly

    #pip install -r requirements.txt
    #pip install .
    “`
    Note: You can perform these steps from your host machine or within the nv-ingest container.

    3. Submitting Ingestion Jobs

    Python Client Example:

    import logging, time
    
    from nv_ingest_client.client import NvIngestClient
    from nv_ingest_client.primitives import JobSpec
    from nv_ingest_client.primitives.tasks import ExtractTask
    from nv_ingest_client.util.file_processing.extract import extract_file_content
    
    logger = logging.getLogger("nv_ingest_client")
    
    file_name = "data/multimodal_test.pdf"
    file_content, file_type = extract_file_content(file_name)
    
    job_spec = JobSpec(
     document_type=file_type,
     payload=file_content,
     source_id=file_name,
     source_name=file_name,
     extended_options={
         "tracing_options": {
             "trace": True,
             "ts_send": time.time_ns()
         }
     }
    )
    
    extract_task = ExtractTask(
     document_type=file_type,
     extract_text=True,
     extract_images=True,
     extract_tables=True
    )
    
    job_spec.add_task(extract_task)
    
    client = NvIngestClient(
     message_client_hostname="localhost",  # Host where nv-ingest-ms-runtime is running
     message_client_port=7670  # REST port, defaults to 7670
    )
    
    job_id = client.add_job(job_spec)
    client.submit_job(job_id, "morpheus_task_queue")
    result = client.fetch_job_result(job_id, timeout=60)
    print(f"Got {len(result)} results")

    Command Line (nv-ingest-cli) Example:

    nv-ingest-cli \
        --doc ./data/multimodal_test.pdf \
        --output_directory ./processed_docs \
        --task='extract:{"document_type": "pdf", "extract_method": "pdfium", "extract_tables": "true", "extract_images": "true"}' \
        --client_host=localhost \
        --client_port=7670

    Note: Make sure to adjust the file_path, client_host and client_port as per your setup.

    Note: extract_tables controls both table and chart extraction, you can disable chart extraction using extract_charts parameter set to false.

    4. Inspecting Results

    Post ingestion, results can be found in processed_docs directory, under text, image and structured subdirectories. Each result will contain corresponding json metadata files. You can inspect the extracted images using the provided image viewer script:

    1. First, install tkinter by running the following commands depending on your OS.

      For Ubuntu/Debian:
      sudo apt-get update
      sudo apt-get install python3-tk

      # For Fedora/RHEL:
      sudo dnf install python3-tkinter

      # For MacOS
      brew install python-tk
    2. Run image viewer:
      python src/util/image_viewer.py --file_path ./processed_docs/image/multimodal_test.pdf.metadata.json

    Understanding the Output

    The output of NVIDIA NV Ingest is a structured JSON document, which contains:

    • Extracted Text: Text content from the document.
    • Extracted Tables: Table data in structured format.
    • Extracted Charts: Information about charts present in the document.
    • Extracted Images: Metadata for extracted images.
    • Processing Annotations: Timing and tracing data for analysis.

    This output can be easily integrated into various systems, including vector databases for semantic search and LLM applications.

    This output can be easily integrated into various systems, including vector databases for semantic search and LLM applications.

    NVIDIA NV Ingest Use Cases

    NVIDIA NV Ingest is ideal for various applications, including:

    • Retrieval-Augmented Generation (RAG): Enhance LLMs with accurate and contextualized data from your documents.
    • Enterprise Search: Improve search capabilities by indexing text and metadata from large document repositories.
    • Data Analysis: Unlock hidden patterns and insights within unstructured data.
    • Automated Document Processing: Streamline workflows by automating the extraction process from unstructured documents.

    Troubleshooting

    Common Issues

    • NIM Containers Not Starting: Check resource availability (GPU memory, CPU), verify NGC login details, and ensure the correct CUDA driver is installed.
    • Python Client Errors: Verify dependencies are installed correctly and the client is configured to connect with the running service.
    • Job Failures: Examine the logs for detailed error messages, check the input document for errors, and verify task configuration.

    Tips

    • Verbose Logging: Enable verbose logging by setting NIM_TRITON_LOG_VERBOSE=1 in docker-compose.yaml to help diagnose issues.
    • Container Logs: Use docker logs to inspect logs for each container to identify problems.
    • GPU Utilization: Use nvidia-smi to monitor GPU activity. If it takes more than a minute for nvidia-smi command to return there is a high chance that the GPU is busy setting up the models.

  • Cache-Augmented Generation (CAG): Superior Alternative to RAG

    In the rapidly evolving world of AI and Large Language Models (LLMs), the quest for efficient and accurate information retrieval is paramount. While Retrieval-Augmented Generation (RAG) has become a popular technique, a new paradigm called Cache-Augmented Generation (CAG) is emerging as a more streamlined and effective solution. This post will delve into Cache-Augmented Generation (CAG), comparing it to RAG, and highlight when CAG is the better choice for enhanced performance.

    What is Cache-Augmented Generation (CAG)?

    Cache-Augmented Generation (CAG) is a method that leverages the power of large language models with extended context windows to bypass the need for real-time retrieval systems, which are required by the RAG approach. Unlike RAG, which retrieves relevant information from external sources during the inference phase, CAG preloads all relevant resources into the LLM’s extended context. This includes pre-computing and caching the model’s key-value (KV) pairs.

    Here are the key steps involved in CAG:

    1. External Knowledge Preloading: A curated collection of documents or relevant knowledge is processed and formatted to fit within the LLM’s extended context window. The LLM then converts this data into a precomputed KV cache.
    2. Inference: The user’s query is loaded alongside the precomputed KV cache. The LLM uses this cached context to generate responses without needing any retrieval at this step.
    3. Cache Reset: The KV cache is managed to allow for rapid re-initialization, ensuring sustained speed and responsiveness across multiple inference sessions.

    Essentially, CAG trades the need for real-time retrieval with pre-computed knowledge, leading to significant performance gains.

    CAG vs RAG: A Direct Comparison

    Understanding the difference between CAG vs RAG is crucial for determining the most appropriate approach for your needs. Let’s look at a direct comparison:

    FeatureRAG (Retrieval-Augmented Generation)CAG (Cache-Augmented Generation)
    RetrievalPerforms real-time retrieval of information during inference.Preloads all relevant knowledge into the model’s context beforehand.
    LatencyIntroduces retrieval latency, potentially slowing down response times.Eliminates retrieval latency, providing much faster response times.
    ErrorsSubject to potential errors in document selection and ranking.Minimizes retrieval errors by ensuring holistic context is present.
    ComplexityIntegrates retrieval and generation components, which increases system complexity.Simplifies architecture by removing the need for separate retrieval components.
    ContextContext is dynamically added with each new query.A complete and unified context from preloaded data.
    PerformancePerformance can suffer with retrieval failures.Maintains consistent and high-quality responses by leveraging the whole context.
    Memory UsageUses additional memory and resources for external retrieval.Uses preloaded KV-cache for efficient resource management.
    EfficiencyCan be inefficient, and require resource-heavy real-time retrieval.Faster and more efficient due to elimination of real-time retrieval.

    Which is Better: CAG or RAG?

    The question of which is better, CAG or RAG, depends on the specific context and requirements. However, CAG offers significant advantages in certain scenarios, especially:

    • For limited knowledge base: When the relevant knowledge fits within the extended context window of the LLM, CAG is more effective.
    • When real-time performance is critical: By eliminating retrieval, CAG provides faster, more consistent response times.
    • When consistent and accurate information is required: CAG avoids the errors caused by real-time retrieval systems and ensures the LLM uses the complete dataset.
    • When streamlined architecture is essential: By combining knowledge and model in one approach it simplifies the development process.

    When to Use CAG and When to Use RAG

    While CAG provides numerous benefits, RAG is still relevant in certain use cases. Here are general guidelines:

    Use CAG When:

    • The relevant knowledge base is relatively small and manageable.
    • You need fast and consistent responses without the latency of retrieval systems.
    • System simplification is a key requirement.
    • You want to avoid the errors associated with real-time retrieval.
    • Working with Large Language Models supporting long contexts

    Use RAG When:

    • The knowledge base is very large or constantly changing.
    • The required information varies greatly with each query.
    • You need to access real-time data from diverse or external sources.
    • The cost of retrieving information in real time is acceptable for your use case.

    Use Cases of Cache-Augmented Generation (CAG)

    CAG is particularly well-suited for the following use cases:

    • Specialized Domain Q&A: Answering questions based on specific domains, like legal, medical, or financial, where all relevant documentation can be preloaded.
    • Document Summarization: Summarizing lengthy documents by utilizing the complete document as preloaded knowledge.
    • Technical Documentation Access: Allowing users to quickly find information in product manuals, and technical guidelines.
    • Internal Knowledge Base Access: Provide employees with quick access to corporate policies, guidelines, and procedures.
    • Chatbots and Virtual Assistants: For specific functions requiring reliable responses.
    • Research and Analysis: Where large datasets with known context are used.

    Cache-Augmented Generation (CAG) represents a significant advancement in how we leverage LLMs for knowledge-intensive tasks. By preloading all relevant information, CAG eliminates the issues associated with real-time retrieval, resulting in faster, more accurate, and more efficient AI systems. While RAG remains useful in certain circumstances, CAG presents a compelling alternative, particularly when dealing with manageable knowledge bases and when high-performance, and accurate response is needed. Make the move to CAG and experience the next evolution in AI-driven knowledge retrieval.