Imagine having a 24/7 health companion that analyzes your medical history, tracks real-time vitals, and offers tailored advice—all while keeping your data private. This is the reality of AI health assistants, open-source tools merging artificial intelligence with healthcare to empower individuals and professionals alike. Let’s dive into how these systems work, their transformative benefits, and how you can build one using platforms like OpenHealthForAll
What Is an AI Health Assistant?
An AI health assistant is a digital tool that leverages machine learning, natural language processing (NLP), and data analytics to provide personalized health insights. For example:
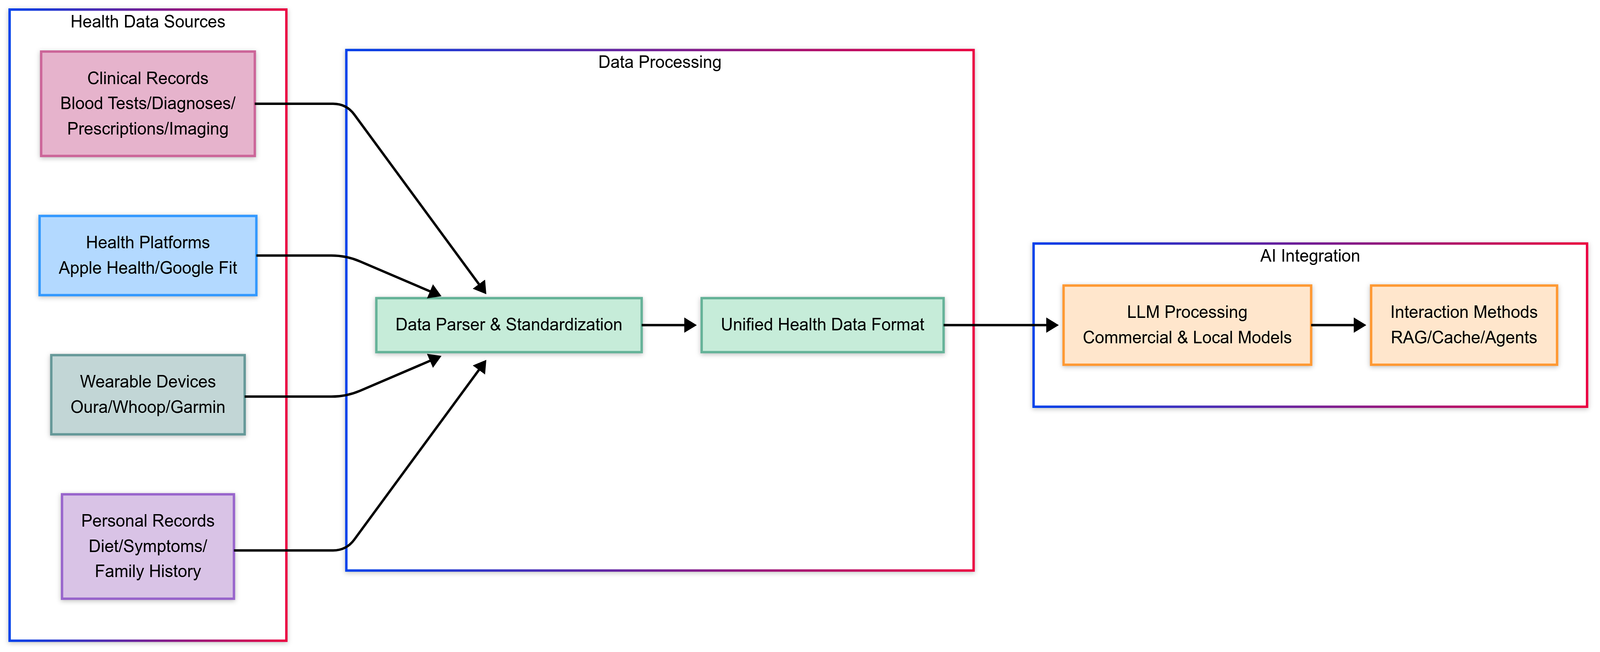
OpenHealth consolidates blood tests, wearable data, and family history into structured formats, enabling GPT-powered conversations about your health.
Aiden, another assistant, uses WhatsApp to deliver habit-building prompts based on anonymized data from Apple Health or Fitbit.
These systems prioritize privacy, often running locally or using encryption to protect sensitive information.
Why AI Health Assistants Matter: 5 Key Benefits
Centralized Health Management Integrate wearables, lab reports, and EHRs into one platform. OpenHealth, for instance, parses blood tests and symptoms into actionable insights using LLMs like Claude or Gemini.
Real-Time Anomaly Detection Projects like Kavya Prabahar’s virtual assistant use RNNs to flag abnormal heart rates or predict fractures from X-rays.
Privacy-First Design Tools like Aiden anonymize data via Evervault and store records on blockchain (e.g., NearestDoctor’s smart contracts) to ensure compliance with regulations like HIPAA.
Empathetic Patient Interaction Assistants like OpenHealth use emotion-aware AI to provide compassionate guidance, reducing anxiety for users managing chronic conditions.
Cost-Effective Scalability Open-source frameworks like Google’s Open Health Stack (OHS) help developers build offline-capable solutions for low-resource regions, accelerating global healthcare access.
Challenges and Ethical Considerations
While promising, AI health assistants face hurdles:
Data Bias: Models trained on limited datasets may misdiagnose underrepresented groups.
Interoperability: Bridging EHR systems (e.g., HL7 FHIR) with AI requires standardization efforts like OHS.
Regulatory Compliance: Solutions must balance innovation with safety, as highlighted in Nature’s call for mandatory feedback loops in AI health tech.
Build Your Own AI Health Assistant: A Developer’s Guide
Step 1: Choose Your Stack
Data Parsing: Use OpenHealth’s Python-based parser (migrating to TypeScript soon) to structure inputs from wearables or lab reports.
AI Models: Integrate LLaMA or GPT-4 via APIs, or run Ollama locally for privacy.
Step 2: Prioritize Security
Encrypt user data with Supabase or Evervault.
Implement blockchain for audit trails, as seen in NearestDoctor’s medical records system.
Step 3: Start the setup
Clone the Repository:
git clone https://github.com/OpenHealthForAll/open-health.git
cd open-health
Setup and Run:
# Copy environment file
cp .env.example .env

# Add API keys to .env file:
# UPSTAGE_API_KEY - For parsing (You can get $10 credit without card registration by signing up at https://www.upstage.ai)
# OPENAI_API_KEY - For enhanced parsing capabilities

# Start the application using Docker Compose
docker compose --env-file .env up
For existing users, use:
docker compose --env-file .env up --build
Access OpenHealth: Open your browser and navigate to http://localhost:3000 to begin using OpenHealth.
The Future of AI Health Assistants
Decentralized AI Marketplaces: Platforms like Ocean Protocol could let users monetize health models securely.
AI-Powered Diagnostics: Google’s Health AI Developer Foundations aim to simplify building diagnostic tools for conditions like diabetes.
Global Accessibility: Initiatives like OHS workshops in Kenya and India are democratizing AI health tech.
Your Next Step
Contribute to OpenHealth’s GitHub repo to enhance its multilingual support.
Virtuoso-Medium-v2 is here, Are you ready to harness the power of Virtuoso-Medium-v2 , the next-generation 32-billion-parameter language model? Whether you’re building advanced chatbots, automating workflows, or diving into research simulations, this guide will walk you through installing and running Virtuoso-Medium-v2 on your local machine. Let’s get started!
Why Choose Virtuoso-Medium-v2?
Before we dive into the installation process, let’s briefly understand why Virtuoso-Medium-v2 stands out:
Distilled from Deepseek-v3 : With over 5 billion tokens worth of logits, it delivers unparalleled performance in technical queries, code generation, and mathematical problem-solving.
Cross-Architecture Compatibility : Thanks to “tokenizer surgery,” it integrates seamlessly with Qwen and Deepseek tokenizers.
Apache-2.0 License : Use it freely for commercial or non-commercial projects.
Now that you know its capabilities, let’s set it up locally.
Prerequisites
Before installing Virtuoso-Medium-v2, ensure your system meets the following requirements:
Hardware :
GPU with at least 24GB VRAM (recommended for optimal performance).
Sufficient disk space (~50GB for model files).
Software :
Python 3.8 or higher.
PyTorch installed (pip install torch).
Hugging Face transformers library (pip install transformers).
Step 1: Download the Model
The first step is to download the Virtuoso-Medium-v2 model from Hugging Face. Open your terminal and run the following commands:
# Install necessary libraries
pip install transformers torch

# Clone the model repository
from transformers import AutoTokenizer, AutoModelForCausalLM

model_name = "arcee-ai/Virtuoso-Medium-v2"
tokenizer = AutoTokenizer.from_pretrained(model_name)
model = AutoModelForCausalLM.from_pretrained(model_name)
This will fetch the model and tokenizer directly from Hugging Face.
Step 2: Prepare Your Environment
Ensure your environment is configured correctly: 1. Set up a virtual environment to avoid dependency conflicts:
python -m venv virtuoso-env
source virtuoso-env/bin/activate  # On Windows: virtuoso-env\Scripts\activate
2. Install additional dependencies if needed:
pip install accelerate
Step 3: Run the Model
Once the model is downloaded, you can test it with a simple prompt. Here’s an example script:
from transformers import AutoTokenizer, AutoModelForCausalLM

# Load the model and tokenizer
model_name = "arcee-ai/Virtuoso-Medium-v2"
tokenizer = AutoTokenizer.from_pretrained(model_name)
model = AutoModelForCausalLM.from_pretrained(model_name)

# Define your input prompt
prompt = "Explain the concept of quantum entanglement in simple terms."
inputs = tokenizer(prompt, return_tensors="pt")

# Generate output
outputs = model.generate(**inputs, max_new_tokens=150)
print(tokenizer.decode(outputs[0], skip_special_tokens=True))
Run the script, and you’ll see the model generate a concise explanation of quantum entanglement!
Step 4: Optimize Performance
To maximize performance:
Use quantization techniques to reduce memory usage.
Enable GPU acceleration by setting device_map="auto" during model loading:
model = AutoModelForCausalLM.from_pretrained(model_name, device_map="auto")
Troubleshooting Tips
Out of Memory Errors : Reduce the max_new_tokens parameter or use quantized versions of the model.
Slow Inference : Ensure your GPU drivers are updated and CUDA is properly configured.
With Virtuoso-Medium-v2 installed locally, you’re now equipped to build cutting-edge AI applications. Whether you’re developing enterprise tools or exploring STEM education, this model’s advanced reasoning capabilities will elevate your projects.
Ready to take the next step? Experiment with Virtuoso-Medium-v2 today and share your experiences with the community! For more details, visit the official Hugging Face repository .
Exciting news from OpenAI—the highly anticipated o3-mini model is now available in ChatGPT and the API, offering groundbreaking capabilities for a wide range of use cases, particularly in science, math, and coding. First previewed in December 2024, o3-mini is designed to push the boundaries of what small models can achieve while keeping costs low and maintaining the fast response times that users have come to expect from o1-mini.
Key Features of OpenAI o3-mini:
🔹 Next-Level Reasoning for STEM Tasks o3-mini delivers exceptional STEM reasoning performance, with particular strength in science, math, and coding. It maintains the cost efficiency and low latency of its predecessor, o1-mini, but packs a much stronger punch in terms of reasoning power and accuracy.
🔹 Developer-Friendly Features For developers, o3-mini introduces a host of highly-requested features:
Function Calling
Structured Outputs
Developer Messages These features make o3-mini production-ready right out of the gate. Additionally, developers can select from three reasoning effort options—low, medium, and high—allowing for fine-tuned control over performance. Whether you’re prioritizing speed or accuracy, o3-mini has you covered.
🔹 Search Integration for Up-to-Date Answers For the first time, o3-mini works with search, enabling it to provide up-to-date answers along with links to relevant web sources. This integration is part of OpenAI’s ongoing effort to incorporate real-time search across their reasoning models, and while it’s still in an early prototype stage, it’s a step towards an even smarter, more responsive model.
🔹 Enhanced Access for Paid Users Pro, Team, and Plus users will have triple the rate limits compared to o1-mini, with up to 150 messages per day instead of the 50 available on the earlier model. Plus, all paid users can select o3-mini-high, which offers a higher-intelligence version with slightly longer response times, ensuring Pro users have unlimited access to both o3-mini and o3-mini-high.
🔹 Free Users Can Try o3-mini! For the first time, free users can also explore o3-mini in ChatGPT by simply selecting the ‘Reason’ button in the message composer or regenerating a response. This brings access to high-performance reasoning capabilities previously only available to paid users.
🔹 Optimized for Precision & Speed o3-mini is optimized for technical domains, where precision and speed are key. When set to medium reasoning effort, it delivers the same high performance as o1 on complex tasks but with much faster response times. In fact, evaluations show that o3-mini produces clearer, more accurate answers with a 39% reduction in major errors compared to o1-mini.
A Model Built for Technical Excellence
Whether you’re tackling challenging problems in math, coding, or science, o3-mini is designed to give you faster, more precise results. Expert testers have found that o3-mini beats o1-mini in 56% of cases, particularly when it comes to real-world, difficult questions like those found in AIME and GPQA evaluations. It’s a clear choice for tasks that require a blend of intelligence and speed.
Rolling Out to Developers and Users
Starting today, o3-mini is rolling out in the Chat Completions API, Assistants API, and Batch API to developers in API usage tiers 3-5. ChatGPT Plus, Team, and Pro users have access starting now, with Enterprise access coming in February.
This model will replace o1-mini in the model picker, making it the go-to choice for STEM reasoning, logical problem-solving, and coding tasks.
OpenAI o3-mini marks a major leap in small model capabilities—delivering both powerful reasoning and cost-efficiency in one package. As OpenAI continues to refine and optimize these models, o3-mini sets a new standard for fast, intelligent, and reliable solutions for developers and users alike.
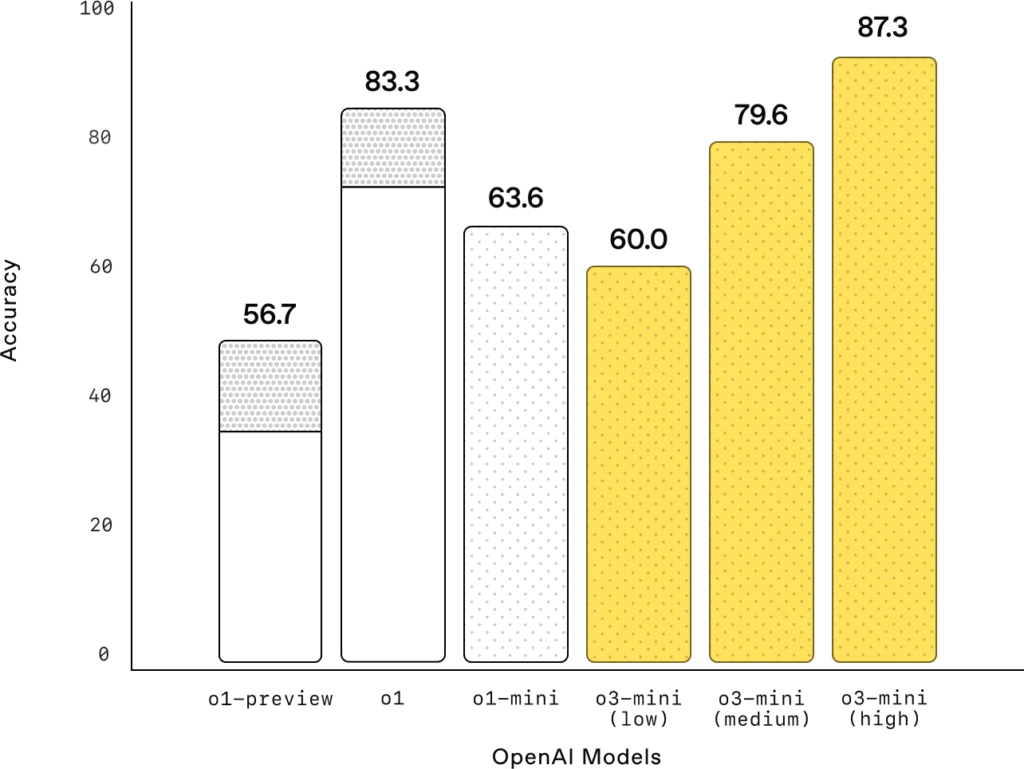
Competition Math (AIME 2024)
Mathematics: With low reasoning effort, OpenAI o3-mini achieves comparable performance with OpenAI o1-mini, while with medium effort, o3-mini achieves comparable performance with o1. Meanwhile, with high reasoning effort, o3-mini outperforms both OpenAI o1-mini and OpenAI o1, where the gray shaded regions show the performance of majority vote (consensus) with 64 samples.
PhD-level Science Questions (GPQA Diamond)
PhD-level science: On PhD-level biology, chemistry, and physics questions, with low reasoning effort, OpenAI o3-mini achieves performance above OpenAI o1-mini. With high effort, o3-mini achieves comparable performance with o1.
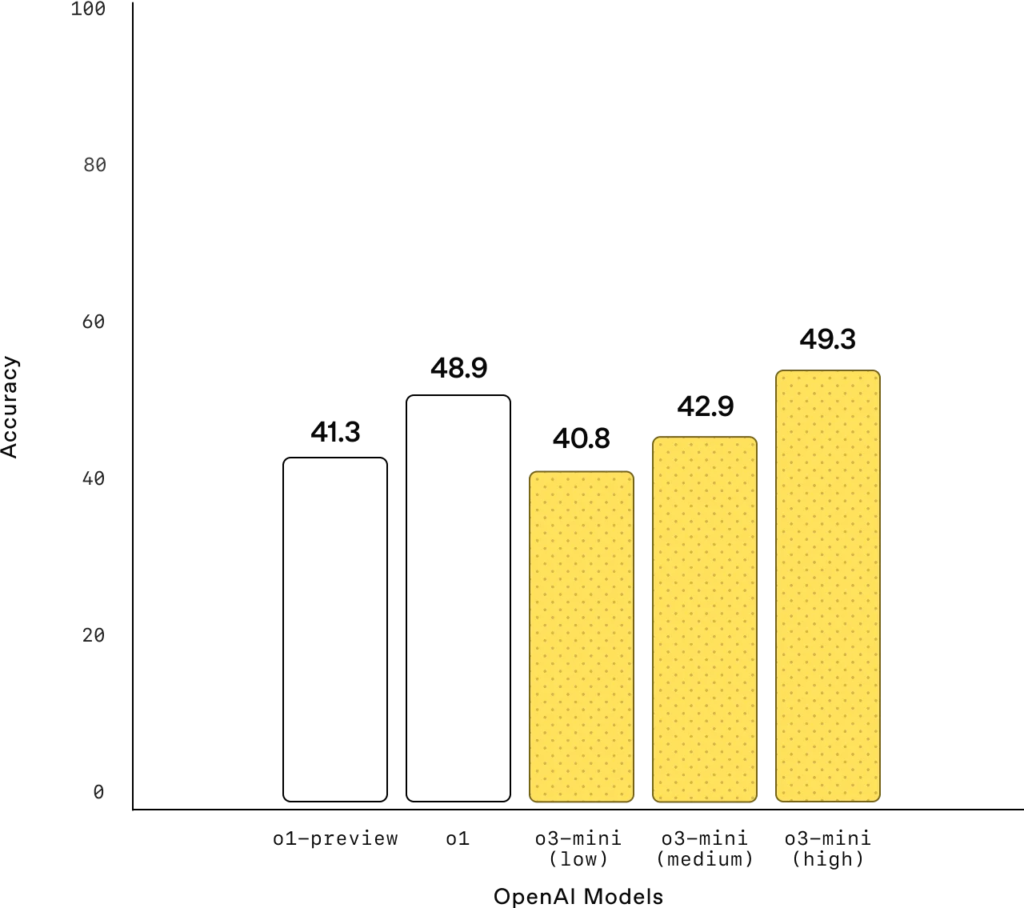
FrontierMath
Research-level mathematics: OpenAI o3-mini with high reasoning performs better than its predecessor on FrontierMath. On FrontierMath, when prompted to use a Python tool, o3-mini with high reasoning effort solves over 32% of problems on the first attempt, including more than 28% of the challenging (T3) problems. These numbers are provisional, and the chart above shows performance without tools or a calculator.
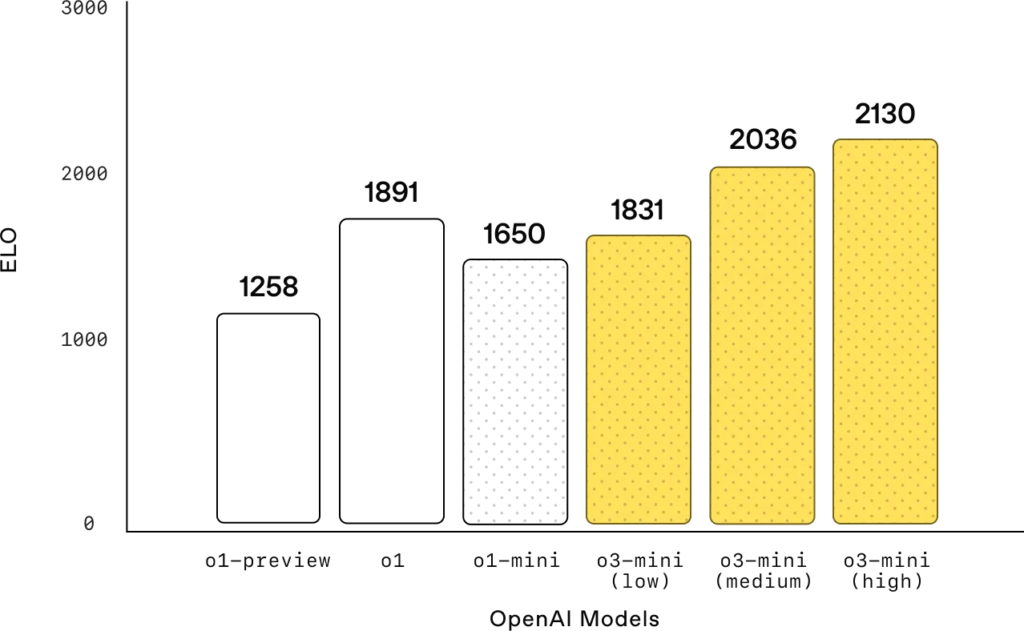
Competition Code (Codeforces)
Competition coding: On Codeforces competitive programming, OpenAI o3-mini achieves progressively higher Elo scores with increased reasoning effort, all outperforming o1-mini. With medium reasoning effort, it matches o1’s performance.
Software Engineering (SWE-bench Verified)
Software engineering: o3-mini is our highest performing released model on SWEbench-verified. For additional datapoints on SWE-bench Verified results with high reasoning effort, including with the open-source Agentless scaffold (39%) and an internal tools scaffold (61%), see our system card.
LiveBench Coding
LiveBench coding: OpenAI o3-mini surpasses o1-high even at medium reasoning effort, highlighting its efficiency in coding tasks. At high reasoning effort, o3-mini further extends its lead, achieving significantly stronger performance across key metrics.
General knowledge
General knowledge: o3-mini outperforms o1-mini in knowledge evaluations across general knowledge domains.
Model speed and performance
With intelligence comparable to OpenAI o1, OpenAI o3-mini delivers faster performance and improved efficiency. Beyond the STEM evaluations highlighted above, o3-mini demonstrates superior results in additional math and factuality evaluations with medium reasoning effort. In A/B testing, o3-mini delivered responses 24% faster than o1-mini, with an average response time of 7.7 seconds compared to 10.16 seconds.
The AI arms race just saw an unexpected twist. In a world dominated by tech giants like OpenAI, DeepMind, and Meta, a small Chinese AI startup, DeepSeek, has managed to turn heads with a $6 million AI model, the DeepSeek R1. The model has taken the world by surprise by outperforming some of the biggest names in AI, prompting waves of discussions across the industry.
For context, when Sam Altman, the CEO of OpenAI, was asked in 2023 about the possibility of small teams building substantial AI models with limited budgets, he confidently declared that it was “totally hopeless.” At the time, it seemed that only the tech giants, with their massive budgets and computational power, stood a chance in the AI race.
Yet, the rise of DeepSeek challenges that very notion. Despite their modest training budget of just $6 million, DeepSeek has not only competed but outperformed several well-established AI models. This has sparked a serious conversation in the AI community, with experts and entrepreneurs weighing in on how fast the AI landscape is shifting. Many have pointed out that AI is no longer just a game for the tech titans but an open field where small, agile startups can compete.
In the midst of this, a new player has entered the ring: Qwen2.5-Max by Alibaba.
What is Qwen2.5-Max?
Qwen2.5-Max is Alibaba’s latest AI model, and it is already making waves for its powerful capabilities and features. While DeepSeek R1 surprised the industry with its efficiency and cost-effectiveness, Qwen2.5-Max brings to the table a combination of speed, accuracy, and versatility that could very well make it one of the most competitive models to date.
Key Features of Qwen2.5-Max:
Code Execution & Debugging in Real-Time Qwen2.5-Max doesn’t just generate code—it runs and debugs it instantly. This is crucial for developers who need to quickly test and refine their code, cutting down development time.
Ultra-Precise Image Generation Forget about the generic AI-generated art we’ve seen before. Qwen2.5-Max creates highly detailed, instruction-following images that will have significant implications in creative industries ranging from design to film production.
AI Video Generation at Lightning Speed Unlike most AI video tools that take time to generate content, Qwen2.5-Max delivers video outputs much faster than the competition, pushing the boundaries of what’s possible in multimedia creation.
Real-Time Web Search & Knowledge Synthesis One of the standout features of Qwen2.5-Max is its ability to perform real-time web searches, gather data, and synthesize information into comprehensive findings. This is a game-changer for researchers, analysts, and businesses needing quick insights from the internet.
Vision Capabilities for PDFs, Images, and Documents By supporting document analysis, Qwen2.5-Max can extract valuable insights from PDFs, images, and other documents, making it an ideal tool for businesses dealing with a lot of paperwork and data extraction.
DeepSeek vs. Qwen2.5-Max: The New AI Rivalry
With the emergence of DeepSeek’s R1 and Alibaba’s Qwen2.5-Max, the landscape of AI development is clearly shifting. The traditional notion that AI innovation requires billion-dollar budgets is being dismantled as smaller players bring forward cutting-edge technologies at a fraction of the cost.
Sam Altman, CEO of OpenAI, acknowledged DeepSeek’s prowess in a tweet, highlighting how DeepSeek’s R1 is impressive for the price point, but he also made it clear that OpenAI plans to “deliver much better models.” Still, Altman admitted that the entry of new competitors is an invigorating challenge.
But as we know, competition breeds innovation, and this could be the spark that leads to even more breakthroughs in the AI space.
Will Qwen2.5-Max Surpass DeepSeek’s Impact?
While DeepSeek has proven that a small startup can still have a major impact on the AI field, Qwen2.5-Max takes it a step further by bringing real-time functionalities and next-gen creative capabilities to the table. Given Alibaba’s vast resources, Qwen2.5-Max is poised to compete directly with the big players like OpenAI, Google DeepMind, and others.
What makes Qwen2.5-Max particularly interesting is its ability to handle diverse tasks, from debugging code to generating ultra-detailed images and videos at lightning speed. In a world where efficiency is king, Qwen2.5-Max seems to have the upper hand in the race for the most versatile AI model.
The Future of AI: Open-Source or Closed Ecosystems?
The rise of these new AI models also raises an important question about the future of AI development. As more startups enter the AI space, the debate around centralized vs. open-source models grows. Some believe that DeepSeek’s success would have happened sooner if OpenAI had embraced a more open-source approach. Others argue that Qwen2.5-Max could be a sign that the future of AI development is shifting away from being controlled by a few dominant players.
One thing is clear: the competition between AI models like DeepSeek and Qwen2.5-Max is going to drive innovation forward, and we are about to witness an exciting chapter in the evolution of artificial intelligence.
Stay tuned—the AI revolution is just getting started.
In the rapidly evolving landscape of Artificial Intelligence, a new contender has emerged, shaking up the competition. Alibaba has just unveiled Qwen2.5-Max, a cutting-edge AI model that is setting new benchmarks for performance and capabilities. This model not only rivals but also surpasses leading models like DeepSeek V3, GPT-4o, and Claude Sonnet across a range of key evaluations. Qwen2.5-Max is not just another AI model; it’s a leap forward in AI technology.
What Makes Qwen2.5-Max a Game-Changer?
Qwen2.5-Max is packed with features that make it a true game-changer in the AI space:
Code Execution & Debugging: It doesn’t just generate code; it runs and debugs it in real-time. This capability is crucial for developers who need to test and refine their code quickly.
Ultra-Precise Image Generation: Forget generic AI art; Qwen2.5-Max produces highly detailed, instruction-following images, opening up new possibilities in creative fields.
Faster AI Video Generation: This model creates video much faster than the 90% of existing AI tools
Web Search & Knowledge Synthesis: The model can perform real-time searches, gather data, and summarize findings, making it a powerful tool for research and analysis.
Vision Capabilities: Upload PDFs, images, and documents, and Qwen2.5-Max will read, analyze, and extract valuable insights instantly, enhancing its applicability in document-heavy tasks.
Technical Details
Qwen2.5-Max is a large-scale Mixture-of-Experts (MoE) model that has been pre-trained on over 20 trillion tokens. Following pre-training, the model was fine-tuned using Supervised Fine-Tuning (SFT) and Reinforcement Learning from Human Feedback (RLHF), further enhancing its capabilities.
Performance Benchmarks
The performance of Qwen2.5-Max is nothing short of impressive. It has been evaluated across several benchmarks, including:
MMLU-Pro: Testing its knowledge through college-level problems.
LiveCodeBench: Assessing its coding skills.
LiveBench: Measuring its general capabilities.
Arena-Hard: Evaluating its alignment with human preferences.
Qwen2.5-Max significantly outperforms DeepSeek V3 in benchmarks such as Arena-Hard, LiveBench, LiveCodeBench, and GPQA-Diamond. While also showing competitive performance in other assessments like MMLU-Pro. The base models also show significant advantages across most benchmarks when compared to DeepSeek V3, Llama-3.1-405B, and Qwen2.5-72B.
How to Use Qwen2.5-Max
Qwen2.5-Max is now available on Qwen Chat, where you can interact with the model directly. It is also accessible via an API through Alibaba Cloud. Here is the steps to use the API:
Register an Alibaba Cloud account and activate the Alibaba Cloud Model Studio service.
Navigate to the console and create an API key.
Since the APIs are OpenAI-API compatible, you can use them as you would with OpenAI APIs.
Here is an example of using Qwen2.5-Max in Python:
from openai import OpenAI
import os

client = OpenAI(
    api_key=os.getenv("API_KEY"),
    base_url="https://dashscope-intl.aliyuncs.com/compatible-mode/v1",
)

completion = client.chat.completions.create(
    model="qwen-max-2025-01-25",
    messages=[
      {'role': 'system', 'content': 'You are a helpful assistant.'},
      {'role': 'user', 'content': 'Which number is larger, 9.11 or 9.8?'}
    ]
)

print(completion.choices[0].message)
Future Implications
Alibaba’s commitment to continuous research and development is evident in Qwen2.5-Max. The company is dedicated to enhancing the thinking and reasoning capabilities of LLMs through innovative scaled reinforcement learning. This approach aims to unlock new frontiers in AI by potentially enabling AI models to surpass human intelligence.
Citation
If you find Qwen2.5-Max helpful, please cite the following paper:
Qwen2.5-Max represents a significant advancement in AI technology. Its superior performance across multiple benchmarks and its diverse range of capabilities make it a crucial tool for various applications. As Alibaba continues to develop and refine this model, we can expect even more groundbreaking innovations in the future.
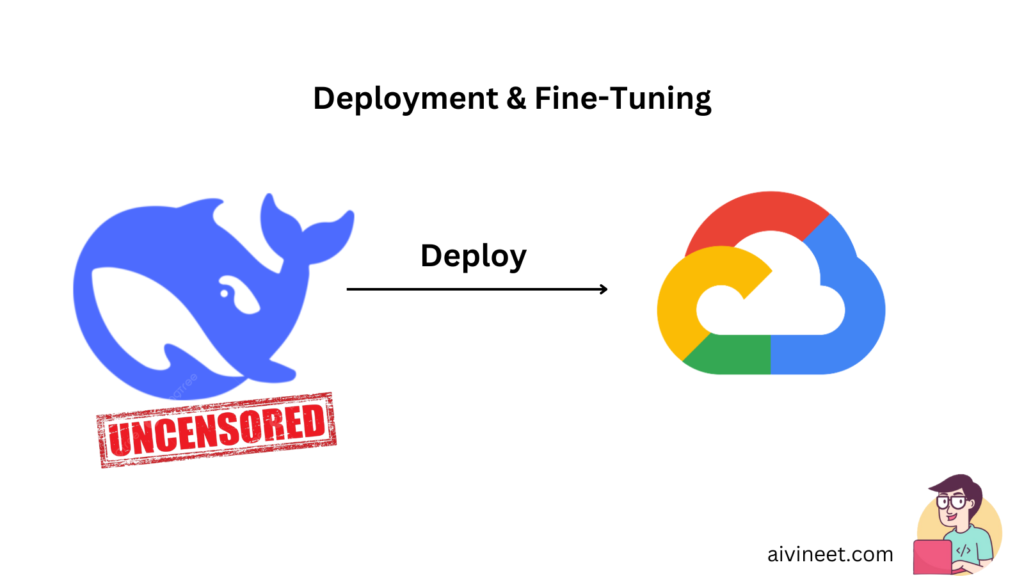
DeepSeek R1 Distill: Complete Tutorial for Deployment & Fine-Tuning
Are you eager to explore the capabilities of the DeepSeek R1 Distill model? This guide provides a comprehensive, step-by-step approach to deploying the uncensored DeepSeek R1 Distill model to Google Cloud Run with GPU support, and also walks you through a practical fine-tuning process. The tutorial is broken down into the following sections:
Environment Setup
FastAPI Inference Server
Docker Configuration
Google Cloud Run Deployment
Fine-Tuning Pipeline
Let’s dive in and get started.
1. Environment Setup
Before deploying and fine-tuning, make sure you have the required tools installed and configured.
1.1 Install Required Tools
Python 3.9+
pip: For Python package installation
Docker: For containerization
Google Cloud CLI: For deployment
Install Google Cloud CLI (Ubuntu/Debian): Follow the official Google Cloud CLI installation guide to install gcloud.
1.2 Authenticate with Google Cloud
Run the following commands to initialize and authenticate with Google Cloud:
gcloud init
gcloud auth application-default login
Ensure you have an active Google Cloud project with Cloud Run, Compute Engine, and Container Registry/Artifact Registry enabled.
2. FastAPI Inference Server
We’ll create a minimal FastAPI application that serves two main endpoints:
/v1/inference: For model inference.
/v1/finetune: For uploading fine-tuning data (JSONL).
Create a file named main.py with the following content:
# main.py
from fastapi import FastAPI, File, UploadFile
from fastapi.responses import JSONResponse
from pydantic import BaseModel
import json

import litellm  # Minimalistic LLM library

app = FastAPI()

class InferenceRequest(BaseModel):
    prompt: str
    max_tokens: int = 512

@app.post("/v1/inference")
async def inference(request: InferenceRequest):
    """
    Inference endpoint using deepseek-r1-distill-7b (uncensored).
    """
    response = litellm.completion(
        model="deepseek/deepseek-r1-distill-7b",
        messages=[{"role": "user", "content": request.prompt}],
        max_tokens=request.max_tokens
    )
    return JSONResponse(content=response)

@app.post("/v1/finetune")
async def finetune(file: UploadFile = File(...)):
    """
    Fine-tune endpoint that accepts a JSONL file.
    """
    if not file.filename.endswith('.jsonl'):
        return JSONResponse(
            status_code=400,
            content={"error": "Only .jsonl files are accepted for fine-tuning"}
        )

    # Read lines from uploaded file
    data = [json.loads(line) for line in file.file]

    # Perform or schedule a fine-tuning job here (simplified placeholder)
    # You can integrate with your training pipeline below.

    return JSONResponse(content={"status": "Fine-tuning request received", "samples": len(data)})
3. Docker Configuration
To containerize the application, create a requirements.txt file:
This command builds the Docker image, deploys it to Cloud Run with one nvidia-l4 GPU, allocates 16 GiB memory and 4 CPU cores, and exposes the service publicly (no authentication).
5. Fine-Tuning Pipeline
This section will guide you through a basic four-stage fine-tuning pipeline similar to DeepSeek R1’s training approach.
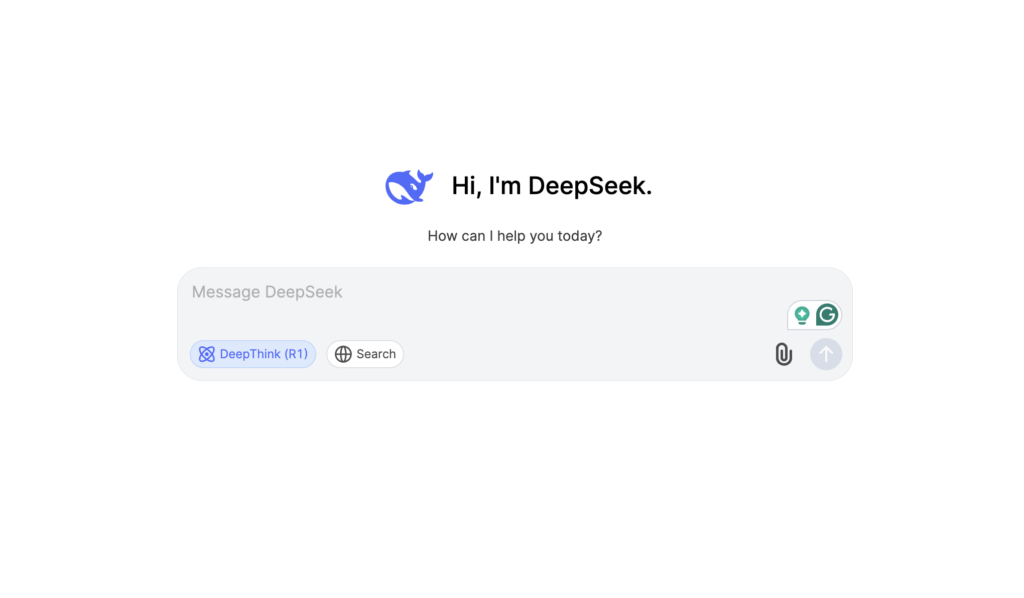
Could DeepSeek be a game-changer in the AI landscape? There’s a buzz in the tech world about DeepSeek outperforming models like ChatGPT. With its DeepSeek-V3 boasting 671 billion parameters and a development cost of just $5.6 million, it’s definitely turning heads. Interestingly, Sam Altman himself has acknowledged some challenges with ChatGPT, which is priced at a $200 subscription, while DeepSeek remains free. This makes the integration of DeepSeek with LangChain even more exciting, opening up a world of possibilities for building sophisticated AI-powered solutions without breaking the bank. Let’s explore how you can get started.
What is DeepSeek?
DeepSeek provides a range of open-source AI models that can be deployed locally or through various inference providers. These models are known for their high performance and versatility, making them a valuable asset for any AI project. You can utilize these models for a variety of tasks such as text generation, translation, and more.
Why use LangChain with DeepSeek?
LangChain simplifies the development of applications using large language models (LLMs), and using it with DeepSeek provides the following benefits:
Simplified Workflow: LangChain abstracts away complexities, making it easier to interact with DeepSeek models.
Chaining Capabilities: Chain operations like prompting and translation to create sophisticated AI applications.
Seamless Integration: A consistent interface for various LLMs, including DeepSeek, for smooth transitions and experiments.
Setting Up DeepSeek with LangChain
To begin, create a DeepSeek account and obtain an API key:
Get an API Key: Visit DeepSeek’s API Key page to sign up and generate your API key.
Set Environment Variables: Set the DEEPSEEK_API_KEY environment variable.
import getpass
import os

if not os.getenv("DEEPSEEK_API_KEY"):
    os.environ["DEEPSEEK_API_KEY"] = getpass.getpass("Enter your DeepSeek API key: ")

# Optional LangSmith tracing
# os.environ["LANGSMITH_TRACING"] = "true"
# os.environ["LANGSMITH_API_KEY"] = getpass.getpass("Enter your LangSmith API key: ")
3. Install the Integration Package: Install the langchain-deepseek-official package.
pip install -qU langchain-deepseek-official
Instantiating and Using ChatDeepSeek
Instantiate ChatDeepSeek model:
from langchain_deepseek import ChatDeepSeek

llm = ChatDeepSeek(
    model="deepseek-chat",
    temperature=0,
    max_tokens=None,
    timeout=None,
    max_retries=2,
    # other params...
)
Invoke the model:
messages = [
    (
        "system",
        "You are a helpful assistant that translates English to French. Translate the user sentence.",
    ),
    ("human", "I love programming."),
]
ai_msg = llm.invoke(messages)
print(ai_msg.content)
This will output the translated sentence in french.
Chaining DeepSeek with LangChain Prompts
Use ChatPromptTemplate to create a translation chain:
from langchain_core.prompts import ChatPromptTemplate

prompt = ChatPromptTemplate(
    [
        (
            "system",
            "You are a helpful assistant that translates {input_language} to {output_language}.",
        ),
        ("human", "{input}"),
    ]
)

chain = prompt | llm
result = chain.invoke(
    {
        "input_language": "English",
        "output_language": "German",
        "input": "I love programming.",
    }
)
print(result.content)
This demonstrates how easily you can configure language translation using prompt templates and DeepSeek models.
Integrating DeepSeek using LangChain allows you to create advanced AI applications with ease and efficiency, and offers a potential alternative to other expensive models in the market. By following this guide, you can set up, use, and chain DeepSeek models to perform various tasks. Explore the API Reference for more detailed information.
In today’s data-driven world, organizations are constantly seeking innovative solutions to extract value from their vast troves of information. The convergence of powerful hardware, advanced AI frameworks, and efficient data management systems is critical for success. This post will delve into a cutting-edge solution: EnterpriseAgentic RAG on Dell AI Factory with NVIDIA and Elasticsearch vector database. This architecture provides a scalable, compliant, and high-performance platform for complex data retrieval and decision-making, with particular relevance to healthcare and other data-intensive industries.
Understanding the Core Components
Before diving into the specifics, let’s define the key components of this powerful solution:
Agentic RAG: Agentic Retrieval-Augmented Generation (RAG) is an advanced AI framework that combines the power of Large Language Models (LLMs) with the precision of dynamic data retrieval. Unlike traditional LLMs that rely solely on pre-trained knowledge, Agentic RAG uses intelligent agents to connect with various data sources, ensuring contextually relevant, up-to-date, and accurate responses. It goes beyond simple retrieval to create a dynamic workflow for decision-making.
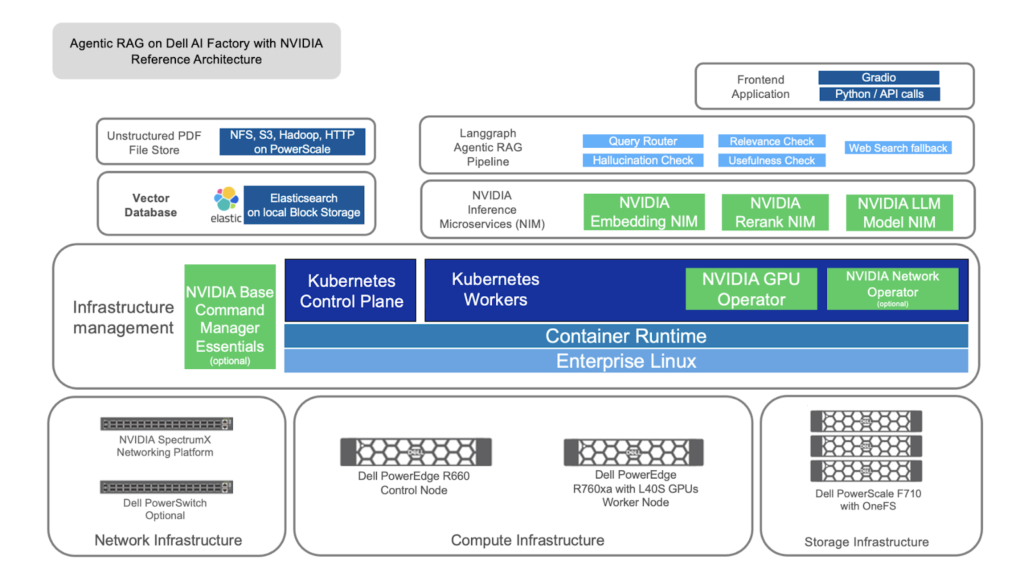
Dell AI Factory with NVIDIA: This refers to a robust hardware and software infrastructure provided by Dell Technologies in collaboration with NVIDIA. It leverages NVIDIA GPUs, Dell PowerEdge servers, and NVIDIA networking technologies to provide an efficient platform for AI training, inference, and deployment. This partnership brings together industry-leading hardware with AI microservices and libraries, ensuring optimal performance and reliability.
Elasticsearch Vector Database: Elasticsearch is a powerful, scalable search and analytics engine. When configured as a vector database, it stores vector embeddings of data (e.g., text, images) and enables efficient similarity searches. This is essential for the RAG process, where relevant information needs to be retrieved quickly from large datasets.
The Synergy of Enterprise Agentic RAG, Dell AI Factory, and Elasticsearch
The integration of Agentic RAG on Dell AI Factory with NVIDIA and Elasticsearch vector database creates a powerful ecosystem for handling complex data challenges. Here’s how these components work together:
Data Ingestion: The process begins with the ingestion of structured and unstructured data from various sources. This includes documents, PDFs, text files, and structured databases. Dell AI Factory leverages specialized tools like the NVIDIA Multimodal PDF Extraction Tool to convert unstructured data (e.g., images and charts in PDFs) into searchable formats.
Data Storage and Indexing: The extracted data is then transformed into vector embeddings using NVIDIA NeMo Embedding NIMs. These embeddings are stored in the Elasticsearch vector database, which allows for efficient semantic searches. Elasticsearch’s fast search capabilities ensure that relevant data can be accessed quickly.
Data Retrieval: Upon receiving a query, the system utilizes the NeMo Retriever NIM to fetch the most pertinent information from the Elasticsearch vector database. The NVIDIA NeMo Reranking NIM refines these results to ensure that the highest quality, contextually relevant content is delivered.
Response Generation: The LLM agent, powered by NVIDIA’s Llama-3.1-8B-instruct NIM or similar LLMs, analyzes the retrieved data to generate a contextually aware and accurate response. The entire process is orchestrated by LangGraph, which ensures smooth data flow through the system.
Validation: Before providing the final answer, a hallucination check module ensures that the response is grounded in the retrieved data and avoids generating false or unsupported claims. This step is particularly crucial in sensitive fields like healthcare.
Benefits of Agentic RAG on Dell AI Factory with NVIDIA and Elasticsearch
This powerful combination offers numerous benefits across various industries:
Scalability: The Dell AI Factory’s robust infrastructure, coupled with the scalability of Elasticsearch, ensures that the solution can handle massive amounts of data and user requests without performance bottlenecks.
Compliance: The solution is designed to adhere to stringent security and compliance requirements, particularly relevant in healthcare where HIPAA compliance is essential.
Real-Time Decision-Making: Through efficient data retrieval and analysis, professionals can access timely, accurate, and context-aware information.
Enhanced Accuracy: The combination of a strong retrieval system and a powerful LLM ensures that the responses are not only contextually relevant but also highly accurate and reliable.
Flexibility: The modular design of the Agentic RAG framework, with its use of LangGraph, makes it adaptable to diverse use cases, whether for chatbots, data analysis, or other AI-powered applications.
Comprehensive Data Support: This solution effectively manages a wide range of data, including both structured and unstructured formats.
Improved Efficiency: By automating the data retrieval and analysis process, the framework reduces the need for manual data sifting and improves overall productivity.
Real-World Use Cases for Enterprise Agentic RAG
This solution can transform workflows in many different industries and has particular relevance for use cases in healthcare settings:
Healthcare:
Providing clinicians with fast access to patient data, medical protocols, and research findings to support better decision-making.
Enhancing patient interactions through AI-driven chatbots that provide accurate, secure information.
Streamlining processes related to diagnosis, treatment planning, and drug discovery.
Finance:
Enabling rapid access to financial data, market analysis, and regulations for better investment decisions.
Automating processes related to fraud detection, risk analysis, and regulatory compliance.
Legal:
Providing legal professionals with quick access to case laws, contracts, and legal documents.
Supporting faster research and improved decision-making in legal proceedings.
Manufacturing:
Providing access to operational data, maintenance logs, and training manuals to improve efficiency.
Improving workflows related to predictive maintenance, quality control, and production management.
Getting Started with Enterprise Agentic RAG
The Dell AI Factory with NVIDIA, when combined with Elasticsearch, is designed for enterprises that require scalability and reliability. To implement this solution:
Leverage Dell PowerEdge servers with NVIDIA GPUs: These powerful hardware components provide the computational resources needed for real-time processing.
Set up Elasticsearch Vector Database: This stores and indexes your data for efficient retrieval.
Install NVIDIA NeMo NIMs: Integrate NVIDIA’s NeMo Retriever, Embedding, and Reranking NIMs for optimal data retrieval and processing.
Utilize the Llama-3.1-8B-instruct LLM: Utilize NVIDIA’s optimized LLM for high-performance response generation.
Orchestrate workflows with LangGraph: Connect all components with LangGraph to manage the end-to-end process.
EnterpriseAgentic RAG on Dell AI Factory with NVIDIA and Elasticsearch vector database is not just an integration; it’s a paradigm shift in how we approach complex data challenges. By combining the precision of enterprise-grade hardware, the power of NVIDIA AI libraries, and the efficiency of Elasticsearch, this framework offers a robust and scalable solution for various industries. This is especially true in fields such as healthcare where reliable data access can significantly impact outcomes. This solution empowers organizations to make informed decisions, optimize workflows, and improve efficiency, setting a new standard for AI-driven data management and decision-making.
Realtime 3D model, Stability AI is revolutionizing the world of 3D content creation with its latest offering: SPAR3D, a groundbreaking free and open-source realtime 3D model. This model enables users to generate, edit, and interact with 3D objects from single images in real-time, combining impressive speed with unparalleled control. SPAR3D is not just a 3D model; it’s a comprehensive tool designed to transform 3D prototyping for game developers, product designers, environment builders, and anyone needing high-quality 3D assets.
What is SPAR3D?
SPAR3D (Stable Point Aware 3D) is a state-of-the-art 3D reconstruction model that achieves high-quality 3D mesh generation from single-view images, in near real-time. Unlike traditional 3D modeling methods, SPAR3D uniquely combines precise point cloud sampling with advanced mesh generation. What sets SPAR3D apart is its support for real-time editing, allowing users to make on-the-fly adjustments and modifications to 3D objects. Furthermore, this is available as free and open source under the Stability AI Community License.
Key Features and Benefits of SPAR3D
SPAR3D provides several significant advantages over other 3D modeling techniques:
Real-Time Editing: Allows users to directly manipulate the 3D model by editing the point cloud, deleting, duplicating, stretching, and even recoloring points. This level of control is unmatched by other methods.
Complete Structure Prediction: Generates not only the visible surfaces from an input image, but also accurately predicts the full 360-degree view, including traditionally hidden surfaces on the back of the object. This gives a complete picture of the 3D object.
Lightning-Fast Generation: Converts edited point clouds into final 3D meshes in just 0.3 seconds, enabling seamless real-time editing, and generates the complete 3D mesh from a single input image in only 0.7 seconds per object.
High-Quality Meshes: Achieves precise geometry and detailed textures, producing visually accurate and high-fidelity 3D assets.
Open Source and Free: Licensed under the Stability AI Community License, SPAR3D is free for both commercial and non-commercial use, making it accessible to a wide range of users.
Accessibility: The weights of SPAR3D are available on Hugging Face, and the code is available on GitHub, with access through the Stability AI Developer Platform API.
Compatibility: Ideal for running on NVIDIA RTX AI PCs
How SPAR3D Works: A Two-Stage Architecture
SPAR3D’s a Realtime 3D models, innovative approach involves a first-of-its-kind, two-stage architecture:
Point Sampling Stage: A specialized point diffusion model generates a detailed point cloud, capturing the object’s fundamental structure. This point cloud represents the underlying structure of the object.
Meshing Stage: The triplane transformer processes this point cloud alongside the original image features, producing high-resolution triplane data. This data is then used to generate the final 3D mesh, with precise geometry, texture, and illumination information.
By combining precise point cloud sampling and advanced mesh generation, SPAR3D takes the best of both regression-based modeling’s precision and generative techniques’ flexibility. This results in accurate 360-degree predictions and highly controllable 3D object generation.
Real-World Applications of SPAR3D a Realtime 3D model
SPAR3D’s capabilities make it suitable for a wide variety of applications, including:
Game Development: Rapidly create and modify 3D game assets, from characters to environments.
Product Design: Quickly prototype and refine product designs, enabling faster iteration and improved design processes.
Architecture and Interior Design: Design and visualize 3D spaces and objects, creating immersive experiences for clients.
Filmmaking: Create realistic 3D props and environments for film and animation projects.
Augmented Reality (AR): Develop interactive 3D objects for AR applications with real-time manipulation.
Virtual Reality (VR): Generate high-quality 3D assets for VR environments.
Education: Provide interactive 3D models for education and training purposes.
Research: Enable faster iteration for generating high quality 3D assets in AI/ML research.
Getting Started with SPAR3D, Realtime 3D model
SPAR3D is designed for ease of access and implementation. You can get started by:
Downloading weights from Hugging Face: Access the pre-trained model weights to quickly integrate SPAR3D into your projects.
Accessing code on GitHub: Explore the open-source codebase, enabling you to modify and extend the model to meet specific needs.
Using Stability AI Developer Platform API: Integrate SPAR3D into your applications and workflows through the Stability AI Developer Platform API.
SPAR3D by Stability AI is setting a new benchmark for real-time 3D object generation and editing. As a free and open-source tool, it empowers creators across multiple industries, from game development and product design to filmmaking and augmented reality. Its innovative architecture, unprecedented control, and lightning-fast generation make it an essential asset for anyone working with 3D content. Embrace the future of 3D modeling with SPAR3D and unlock new possibilities for creativity and efficiency.
LLMs for vehicles, The automotive industry is undergoing a significant transformation, with software playing an increasingly vital role. Large language models (LLMs), specifically optimized small language models (sLMS), are emerging as powerful tools to enhance in-vehicle experiences. This post will delve into the world of LLMs for vehicles, explaining what they are, how we can benefit from them, their real-world use cases, and how they are optimized for in-vehicle function-calling. We will also briefly touch upon specific efforts like the Mercedes Benz LLM model.
What are LLMs and sLMS?
LLMs (Large Language Models) are sophisticated AI models trained on vast amounts of text data. They excel at understanding and generating human-like text, enabling a wide range of applications such as natural language processing, text generation, and question answering. However, traditional LLMs are often too large to be deployed on resource-constrained devices such as those found in vehicles.
This is where sLMS (Small Language Models) come into play. sLMS, or Small large language models, are smaller, more efficient versions of LLMs, specifically designed to run on edge devices with limited computational resources. They are optimized for size and speed while maintaining a high level of performance, making them ideal for in-vehicle applications.
How Can We Benefit from LLMs and sLMS in Vehicles?
The integration of LLMs for vehicles, particularly through sLMS, offers numerous benefits:
Enhanced User Experience: Natural, intuitive voice commands make interacting with vehicle systems easier and more user-friendly.
Personalization: sLMS can understand user preferences and adapt vehicle settings accordingly.
Seamless Integration: New features and updates can be integrated more quickly, reducing development time.
Dynamic Control: Vehicle settings, such as seat heating, lighting, and temperature, can be controlled dynamically based on driver conditions.
Reduced Distractions: Voice-activated controls minimize the need for manual adjustments, enhancing driving safety.
Improved Safety: By having natural language processing of the data and the environment, the vehicle can get more accurate information and control, which ultimately makes the drive safer.
Real Use Cases of LLMs and sLMS in Vehicles
The real-world applications of LLMs for vehicles and sLMS are rapidly expanding, transforming in-car experiences:
Voice Assistants: Responding to voice commands for setting navigation, making calls, or playing music.
Interior Control: Dynamically adjusting vehicle settings such as seat heating, ambient lighting, and temperature based on user preferences.
Real-Time Information: Providing real-time updates on traffic, weather, and nearby points of interest.
Personalized Recommendations: Suggesting music, points of interest, or routes based on past preferences and driving habits.
On-Demand Information Access: Answering user questions about vehicle functions or maintenance.
Integration with External Services: Connecting with external applications for seamless control of smart home devices or scheduling apps.
Adaptive Driver Assistance Systems: Enhancing driver assist systems with better awareness of the environment and the driver.
Optimizing Small Language Models for In-Vehicle Function-Calling
Deploying sLMS effectively in vehicles requires careful optimization. The provided PDF highlights several techniques used to optimize the performance of Small Language Models for In-Vehicle Function-Calling:
Model Pruning: Reduces model size by removing less important connections or layers. Depth-wise pruning and width-wise pruning are employed.
Depth-wise pruning focuses on removing entire layers based on similarity.
Width-wise pruning aims at reducing the dimensionality of the layer through techniques like Principal Component Analysis (PCA).
Healing: Fine-tuning the pruned model to recover its performance, using techniques like Low-Rank Adaptation (LoRA) and full fine-tuning.
Quantization: Reducing the numerical precision of model weights to further decrease the size and computational requirements.
Task-Specific Fine-Tuning: Training models on custom datasets for in-vehicle function-calling, incorporating specialized tokens that map language model outputs to gRPC-based vehicle functions.
Specifically, the optimization involves:
Utilizing special MB tokens for vehicle functions to ensure that the language model can directly control the vehicles functions.
Employing a multi-step prompt design to generate high-quality training examples.
Leveraging lightweight runtimes like llama.cpp for on-device inference.
This combination of techniques enables efficient LLM for vehicles deployment on resource-constrained automotive hardware.
Mercedes-Benz LLM Model
Mercedes-Benz, like many automotive manufacturers, is actively exploring the use of LLMs for vehicles to enhance their in-car experiences. While the specific details of their current model are not the focus of the provided PDF, the research presented is closely aligned with those goals. The use of optimized sLMS such as Phi-3 mini, along with specific in-vehicle function-calling dataset is designed to align with the automotive sector and shows an effort to improve the in-car LLM technology.
The approach used demonstrates how real-time, on-device inference of LLM for functions like voice-command, ambient adjustments or maintenance requests, is made possible through advanced optimization techniques and will allow for more advanced in vehicle experience.
Read More on this from the paper published by Mercedes-Benz Research & Development Team.